One of the best things you can have when developing a Windows Phone app is design-time sample data. I will show you in this post how to create sample data from a class using Blend. (click images to view larger)
You can apply this technique to an existing class you have, but for the purposes of this tutorial I’ll be using a File > New Visual Studio 2013 Windows Phone project. If you have an existing app, you can skip to Step 3, but I recommend skimming the first two.
Step One – Create a new Windows Phone Project
- Open Visual Studio, go to File and choose New.
- Choose the “Windows Phone DataBound App” template
- Name it and click OK

The reason I went with the databound template is because it has a ready-to-go ViewModel that I can use to demonstrate the process.
Step Two – Finish up in Visual Studio
Delete the template’s sample data
The template comes with sample data, but I’m going to delete it so we can start from scratch. Here are the steps:
1) Expand the SampleData folder and delete the file named MainViewModelSampleData.xaml

Add a new property to ItemViewModel
1) Expand the ViewModels folder and open the file ItemViewModel.cs
2) Add the DateTime property named “Date” you see in the image below to ItemViewModel

Change the List’s ItemTemplate to display the new property
1) Open MainPage.xaml
2) Locate the LongListSelector named MainLongListSelector (on line 51)
3) Add the following TextBlock to the LongListSelector’s ItemTemplate (see image)
<TextBlock Text="{Binding Date}" Style="{StaticResource PhoneTextAccentStyle}"/>

4) Rebuild the project (VS Menu bar > Build > Rebuild project)
Step Three: Generate Sample Data
Right click on MainPage.xaml in the Solution Explorer and select Open in Blend

Blend is an amazing tool, if you’re not using it then you’re missing out on things like animations and fine UI tweaks. It’s much easier to make your app “pixel perfect” using Blend than it is with Visual Studio.
Now that your project is open in Blend, we can create sample data with just a few clicks.
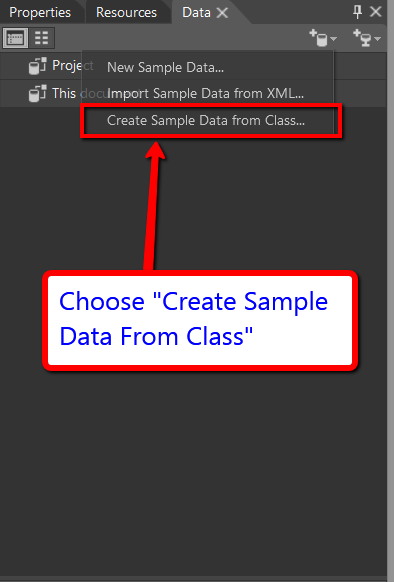
1) Open the Data tab behind the properties pane on the right

2) Click the Create Sample Data dropdown

3) Select Create Sample Data From Class
4) Select MainViewModel and name it “MainViewModelSampleData” (it should prepopulate the name for you, but if it doesn’t, type it in) then click Ok to generate the sample data.

5) Expand the newly formed sample data in the Data tab, and notice how it created sample data for each of the objects in your MainViewModel.
Another really cool thing about Blend is that you can tweak the type of sample data is being used. Go ahead and drop down the “abc” button next to a string property. You’ll see options to edit Lorem Ipsum, use a Company Name, personal Name, email, Price, and more.

Now let’s see the result!
Now everything is in place, go ahead and rebuild the project. In Blend, it’s “Project > Rebuild Project”.
This is what you should now see:

Summary
By generating sample data for design time, you will be able to properly design your UI and get that Pixel Perfect feel that a professionally designed app exudes.
Now go forth and multiply your awesomeness!
Lance
ProTip: You can drag and drop the sample data onto a UI element and Blend will automatically create the binding for you.
3 thoughts on “Creating Design-Time Sample Data”