Manipulation is easier than you think
Posted on January 10, 2017 • 4 minutes • 723 words
Table of contents
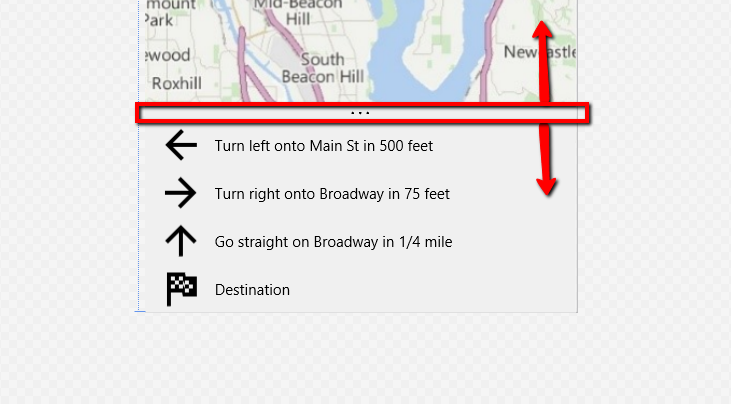
You know that bottom drawer on the Windows 10 navigation app where the upcoming turns are in a list? You know how you can drag it up or down to show more or less of the content? Want to learn how to create it? You’re in luck because that’s what today’s topic is!
Here’s the result of what you’ll be able to do:
<img src="/wp-content/uploads/2017/01/navdrawer.gif?w=214" alt="navdrawer">
The Approach
Let’s get started. Since there are no built-in controls that do this, we’ll create a simple layout (links to source code at the end of the article).
There are the three major sections to the layout:
- **A root container for the main content - **This can just be a Grid that fills the page, nothing special here. In my demo I use an Image control with a picture of a map to keep the concept simple.
- **A handle that the user will drag up and down - **We’ll do that with a thin Grid that contains something so the user knows it can be manipulated (I used a horizontal ellipsis). The responsibility of this Grid is that we need to hook into the ManipulationStarted, ManiuplationDelta and ManipulationEnded events.
- **A drawer container for the content that will be moved - **This is also just another Grid, but it will be on top of the main content Grid. This Grid should have two Rows, one for the “handle” and one for the ListView that holds the example navigation route steps.
There are two main ways to approach moving the drawer container:
- We can translate (move) the entire drawer from off-screen to on-screen
- We can increase the height of the drawer container
Since we want the area inside the drawer to become larger or smaller, we need to use option #2. Changing the height comes with a cost, the content inside will be forced to do layout passes when the height is changed.
However, this is in fact what we want because if we did a translate, then a portion of the container would be off the screen and the content can’t be reached (e.g. the ListView wouldn’t be able to show the last item because it will be offscreen).
If you don’t need to cause layout changes and only want to move it off-screen, take a look at the tutorial here where it shows you how to use a TranslateTransform.
The XAML
Okay, lets get started with the XAML. Here’s the page layout. You’ll see that the “HandleGrid” has manipulation events defined
<Grid x:Name="DrawerContentGrid" VerticalAlignment="Bottom" Background="{ThemeResource AppBarBackgroundThemeBrush}" RenderTransformOrigin="0.5,0.5">
    <Grid.RowDefinitions>
        <RowDefinition Height="Auto" />
        <RowDefinition />
    </Grid.RowDefinitions>
    <Grid x:Name="HandleGrid" ManipulationStarted="HandleGrid_OnManipulationStarted" ManipulationDelta="HandleGrid_OnManipulationDelta" ManipulationCompleted="HandleGrid_OnManipulationCompleted" ManipulationMode="TranslateY" Height="15" Background="{ThemeResource AppBarBorderThemeBrush}" BorderThickness="0,1,0,1" BorderBrush="{ThemeResource AppBarToggleButtonCheckedDisabledBackgroundThemeBrush}">
        <SymbolIcon Symbol="More" />
    </Grid>
    <Grid x:Name="DrawerContent" Grid.Row="1">
        <ListView x:Name="RouteSteps" ItemsSource="{Binding RouteSteps}">
            <ListView.ItemTemplate>
                <DataTemplate>
                    <Grid>
                        <Grid.ColumnDefinitions>
                            <ColumnDefinition Width="Auto" />
                            <ColumnDefinition />
                        </Grid.ColumnDefinitions>
                            <Viewbox Width="48" Height="48">
                                <Canvas Width="24" Height="24">
                                    <Path Data="{Binding Icon}" Fill="Black" />
                                </Canvas>
                            </Viewbox>
                            <TextBlock Text="{Binding Summary}" TextWrapping="Wrap" Margin="10,0,0,0" Grid.Column="1" VerticalAlignment="Center" />
                    </Grid>
                </DataTemplate>
            </ListView.ItemTemplate>
        </ListView>
    </Grid>
</Grid>
The C#
Now, let’s take a look at the event handlers for the events. In the ManipulationStarted and ManipulationEnded event handlers I’m only changing the background brush to the accent color (and back). This lets the user know they’re in contact with the handle and that it can be moved.
private void HandleGrid_OnManipulationStarted(object sender, ManipulationStartedRoutedEventArgs e)
{
    var themeBrush = Application.Current.Resources["AppBarToggleButtonBackgroundCheckedPointerOver"] as SolidColorBrush;

    if (themeBrush != null) HandleGrid.Background = themeBrush;
}

private void HandleGrid_OnManipulationCompleted(object sender, ManipulationCompletedRoutedEventArgs e)
{
    var themeBrush = Application.Current.Resources["AppBarBorderThemeBrush"] as SolidColorBrush;

    if (themeBrush != null)
        HandleGrid.Background = themeBrush;
}
The actual manipulation of the drawer’s height happens in the ManipulationDelta handler, we take the current height and add it to the Y delta (the distance the user moved in the Y direction), then set the Grid’s height with that sum.
private void HandleGrid_OnManipulationDelta(object sender, ManipulationDeltaRoutedEventArgs e)
{
    DrawerContentGrid.Height = DrawerContentGrid.ActualHeight + -e.Delta.Translation.Y;
}
As I mentioned earlier, changing the height of the container means that the bottom edge will always be visible, thus allowing the user to scroll to the last item in the ListView. Just keep in mind that layout passes can be expensive depending on how much content you have in there.
That’s all there is to it, now go add some gestures to your app (and don’t forget to make them discoverable)!
Source Code
Here are the three relevant files to the demo:

