Using Windows IoT, SignalR, Azure Custom Vision and Xamarin Forms to Flush a Toilet
Posted on February 13, 2020 • 8 minutes • 1621 words
Table of contents
My cat uses the human toilet. However, he doesn’t know how to flush when he’s done. So, I thought, “Why not train a custom trained machine learning model to know when to flush the toilet for him? That way, I can go on vacation without asking friends to stop by.”
That single thought began my trip through some great modern developer tools and tech to build a full solution for the problem. In this post, I’ll walk you through everything and you can explore the code and parts list here https://github.com/LanceMcCarthy/Flusher .

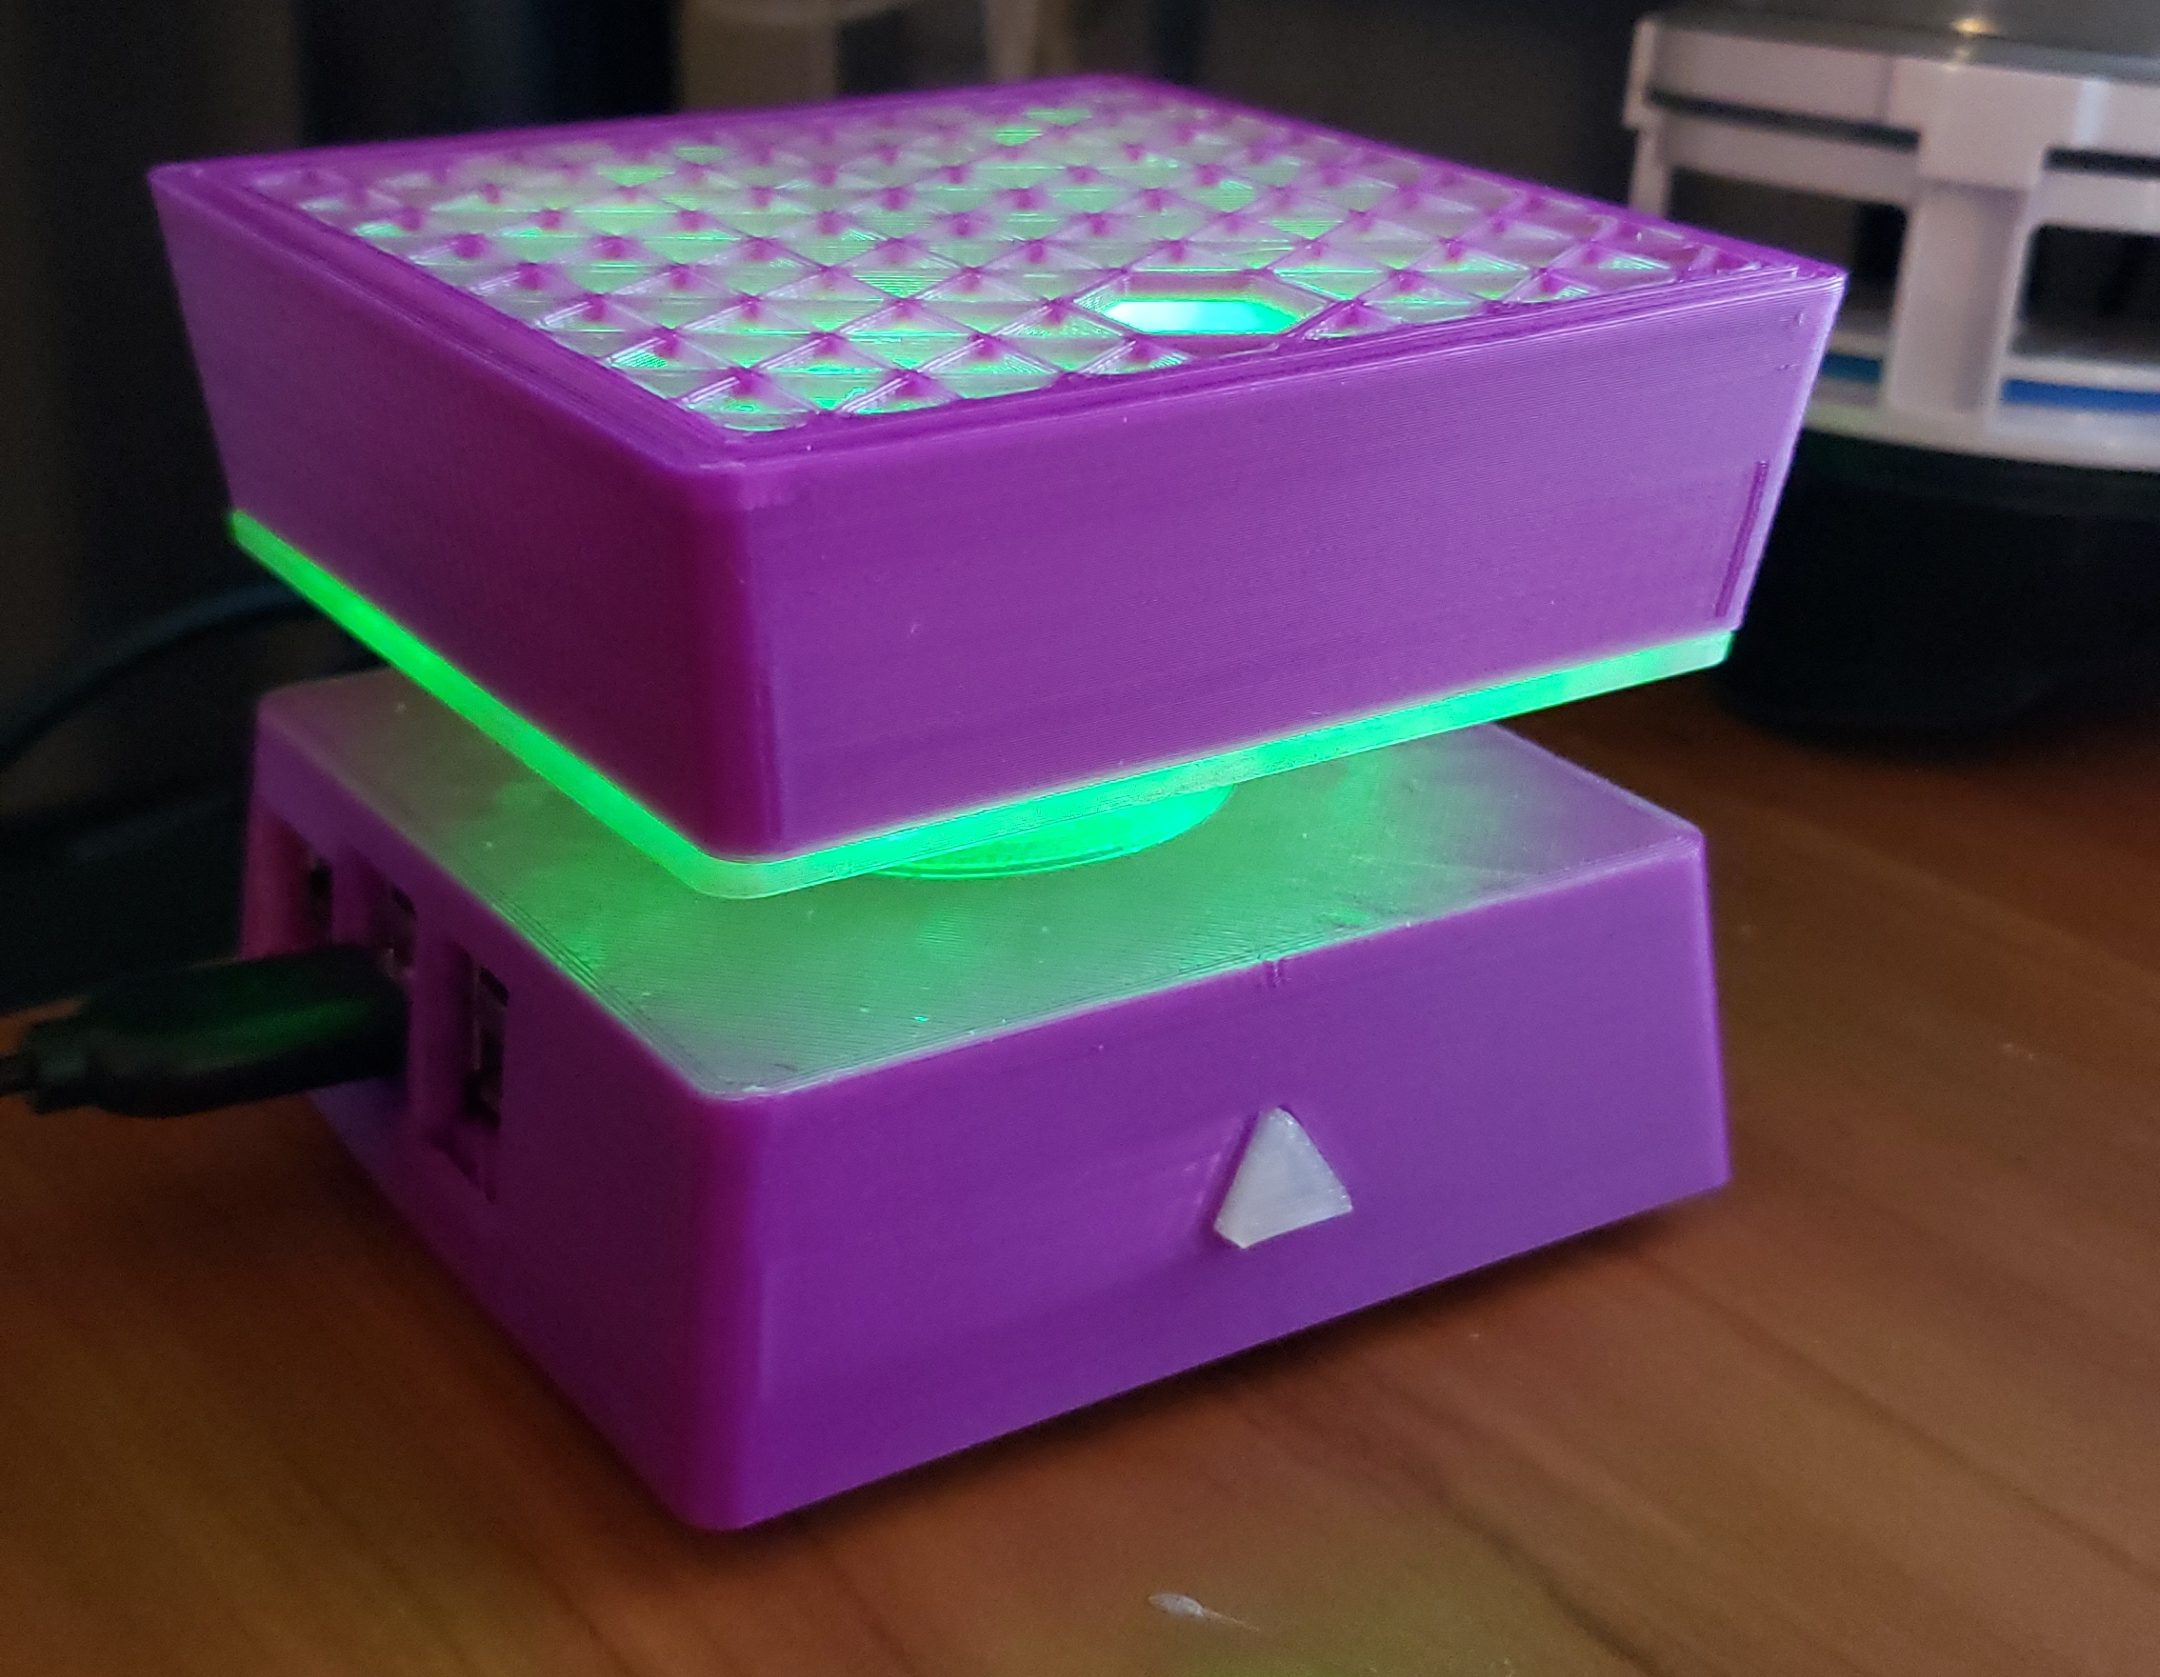
3D Printed case for Raspberry Pi running Windows IoT and Flusher client application. The gray and white item in the background is the toilet valve.
You might have some initial questions like: “Why use AI, why not just use motion detection to flush it?” There are several ways you could use a non-AI approach (like a motion sensor used in public restrooms), but the cat is way too smart and would try to game the system into getting him extra treats. Ultimately, I need a smart/remote way to know there’s a positive hit (ehem, a “number one” or a “number two”) and to flush only then.
The system has several parts:
- Windows IoT Core running on Raspberry Pi 3 (main unit; sensors, controls devices and offline ONNX capability)
- ASP.NET Core app running SignalR Hub and MVC (real time communications between all apps and remote management)
- Azure Storage (blob storage to hold images)
- Azure Custom Vision (AI to analyze images via REST API and offline ONNX model)
- Windows Machine Learning (AI to analyze on the edge)
- Xamarin.Forms (Android, iOS and PC admin apps)
Signal R
Since it is the middle of all the other applications, let’s start with the server project. It is a very simple ASP.NET Core application hosting a SignalR Hub. The hub has 6 methods:
public class FlusherHub : Hub
{
    public async Task SendMessage(string message)
    {
        await Clients.All.SendAsync(ActionNames.ReceiveMessageName, message);
    }

    public async Task SendFlushRequest(string requester)
    {
        await Clients.All.SendAsync(ActionNames.ReceiveFlushRequestName, requester);
    }

    public async Task SendPhotoRequest(string requester)
    {
        await Clients.All.SendAsync(ActionNames.ReceivePhotoRequestName, requester);
    }

    public async Task SendPhotoResult(string message, string imageUrl)
    {
        await Clients.All.SendAsync(ActionNames.ReceivePhotoResultName, message, imageUrl);
    }

    public async Task SendAnalyzeRequest(string requester)
    {
        await Clients.All.SendAsync(ActionNames.ReceiveAnalyzeRequestName, requester);
    }

    public async Task SendAnalyzeResult(string message, string imageUrl)
    {
        await Clients.All.SendAsync(ActionNames.ReceiveAnalyzeResultName, message, imageUrl);
    }
}
All clients subscribe to the hub, each with different responsibilities, using a reusable SignalR service class . The Windows IoT application is concerned with listening for Flush and Analyze requests, while the Xamarin applications send and listen those requests.
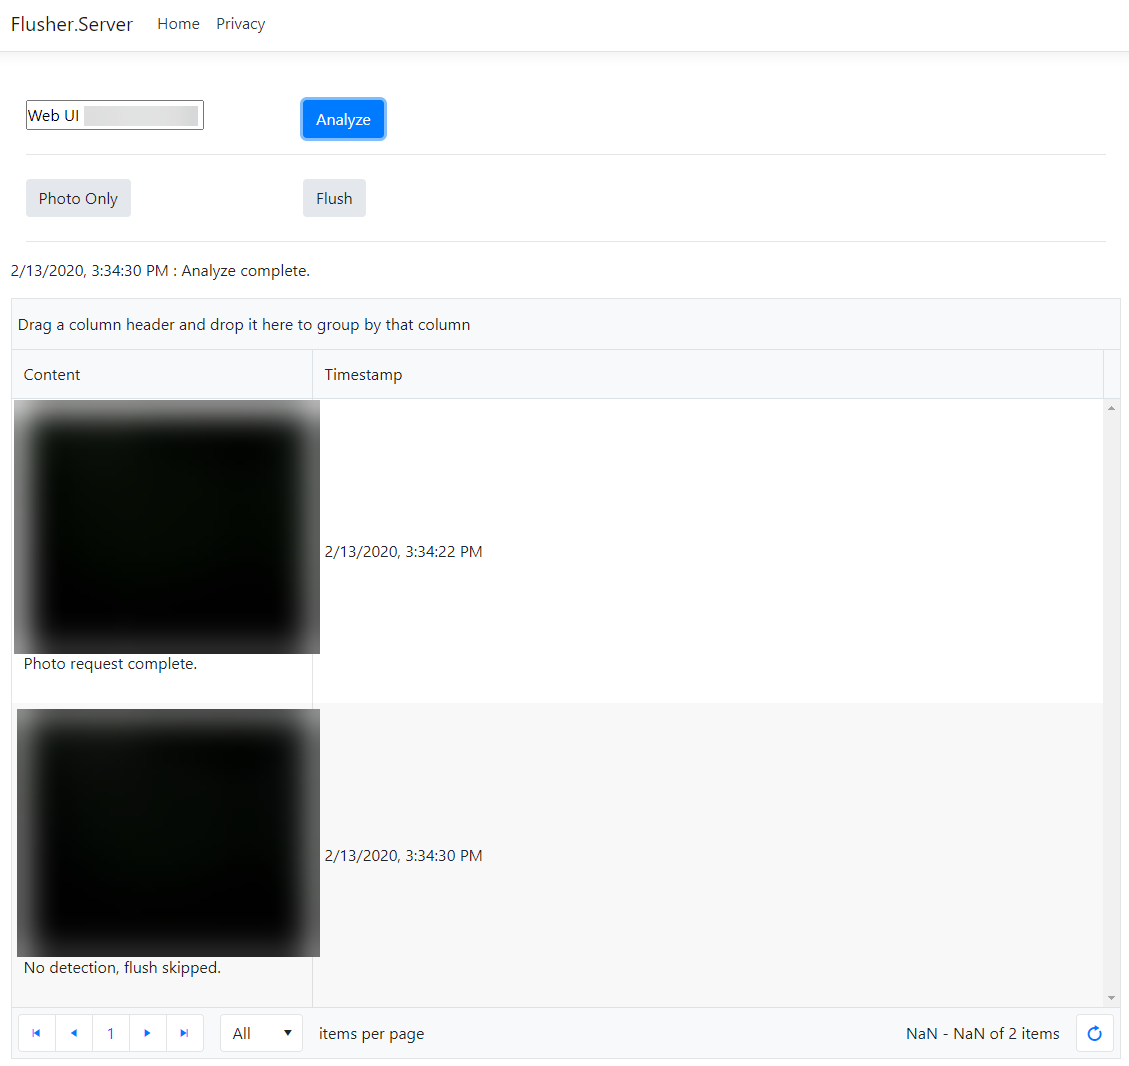
The web application also has an MVC view so I can manually communicate with the IoT client from a web page.
Windows IoT
Now, let’s talk about the component that does all the heavy lifting; the UWP app running on Windows IoT. This app connects to the SignalR hub and listens for commands as well as sends status updates to all the other projects.
I 3D printed a case for the Raspberry Pi 3 so that it was user friendly and self contained. I decided on an amazing model on Thingiverse, check it out here https://www.thingiverse.com/make:760269 .
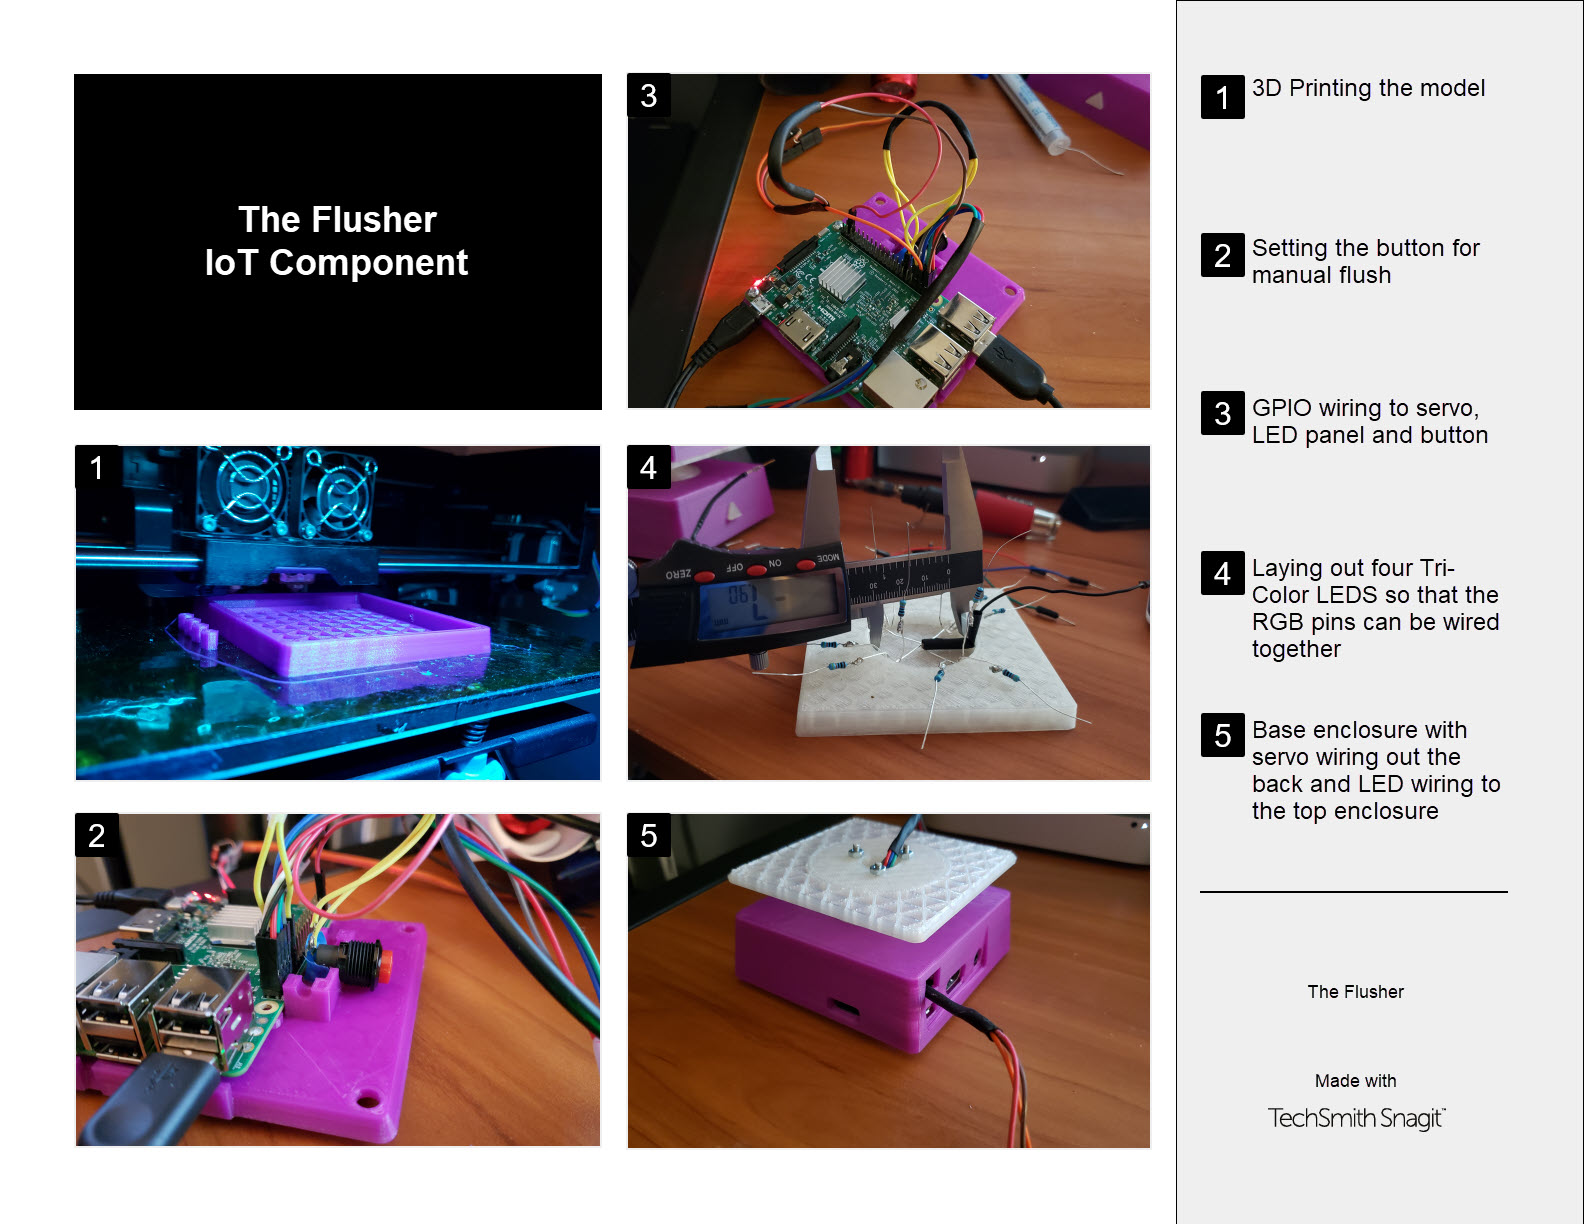
Here’s a high level rundown on the construction:
The mechanical part is just a simple replacement toilet value (Danco link ) that has a convenient cable that the servo can pull:

Digging into each part of the code would make this post too long. You can drill right down to the code here on GitHub . Let me instead explain with some highlights. When the project starts up, it initializes and starts up several services:
// Sets up the Azure Storage connection
await InitializeAzureStorageService();

// Enables the Webcam connected to the Raspberry Pi
await InitializeCameraServiceAsync();

// Setups the GPIO PWM service that allows me to set a specific angle for a servo motor
await InitializeServoServiceAsync();

// connects to the signalR Hub
await InitializeSignalRServiceAsync();

// Initialized the rest of the GPIO Pins (LEDs, button, etc)
InitializeGpio();
Here’s the general workflow:
- When an analyze request comes in or a local trigger occurs (i.e. motion), the app will take a photo.
- It uploads the photo to Azure Storage blob and creates an URL to the image.
- That image URL is then sent to a trained Azure Custom Vision service. The service will return the analyze results to the IoT Client. (or falls back on using Windows ML and an ONYX model on the device to inference).
- If there was a high degree of certainty (85%+) of the presence a #1 or #2, the servo will be moved from 0 degrees to 100 degress and stays there for 5 seconds (this flushes the toilet)
- The IoT client will send the results, with image, to the SignalR hub.
- Extra - In case a human needs to use that guest bathroom, you can press the triangle button in front of the unit to manually flush.
Using the GPIO pins and Windows IoT APIs, the app changes the status lights to let any humans nearby understand the current state of the unit. GPIO is also used for the Flash LED pin and the PWM signal for the servo.
- Green (ready, awaiting command)
- Blue (busy, action in progress)
- Red (exception or other error)
The analyze task logic looks like this:
private async Task<AnalyzeResult> AnalyzeAsync(bool useOnline = true)
{
    try
    {
        // Status LED to indicate operation in progress
        SetLedColor(LedColor.Blue);

        var analyzeResult = new AnalyzeResult();

        // Take a photo
        await flusherService.SendMessageAsync("Generating photo...");
        analyzeResult.PhotoResult = await GeneratePhotoAsync(Requester);

        bool poopDetected;

        if (useOnline)
        {
            Log("[INFO] Analyzing photo using Vision API...");
            await flusherService.SendMessageAsync("Analyzing photo using Vision API...");

            // Option 1 - Online Custom Vision service
            poopDetected = await EvaluateImageAsync(analyzeResult.PhotoResult.BlobStorageUrl);
        }
        else
        {
            Log("[INFO] Analyzing photo offline with Windows ML...");

            await flusherService.SendMessageAsync("Analyzing image with Windows ML...");

            // Option 2 - Use offline Windows ML and ONYX
            poopDetected = await EvaluateImageOfflineAsync(analyzeResult.PhotoResult.LocalFilePath);
        }

        analyzeResult.DidOperationComplete = true;
        analyzeResult.IsPositiveResult = poopDetected;
        analyzeResult.Message = poopDetected ? "Poop detected!" : "No detection, flush skipped.";

        // Update status LED
        SetLedColor(LedColor.Green);

        return analyzeResult;
    }
    catch (Exception ex)
    {
        SetLedColor(LedColor.Red);

        return new AnalyzeResult
        {
            IsPositiveResult = false,
            DidOperationComplete = false,
            Message = $"Error! Analyze operation did not complete: {ex.Message}"
        };
    }
}
If there was a positive result, flush the toilet and send an email:
private async void FlusherService_AnalyzeRequested(string requester)
{
    Log($"[INFO] Analyze Requested by {requester}.");

    await flusherService.SendMessageAsync("Analyzing...");

    var result = await AnalyzeAsync();

    if (result.DidOperationComplete)
    {
        // Inform subscribers of negative/positive result along with photo used for analyzing.
        await flusherService.SendAnalyzeResultAsync(result.Message, result.PhotoResult.BlobStorageUrl);

        // If there was a positive detection, invoke Flush and send email.
        if (result.IsPositiveResult)
        {
            Log("[DETECTION] Poop detected!");
            FlusherService_FlushRequested(Requester);

            Log("[INFO] Alerting email subscribers");
            await SendEmailAsync(result.PhotoResult.BlobStorageUrl);
        }
        else
        {
            Log("[DETECTION] No objects detected.");
        }
    }
    else
    {
        // Inform subscribers of error
        await flusherService.SendMessageAsync("Analyze operation did not complete, please try again later. If this continues to happen, check server or IoT implementation..");
    }
}
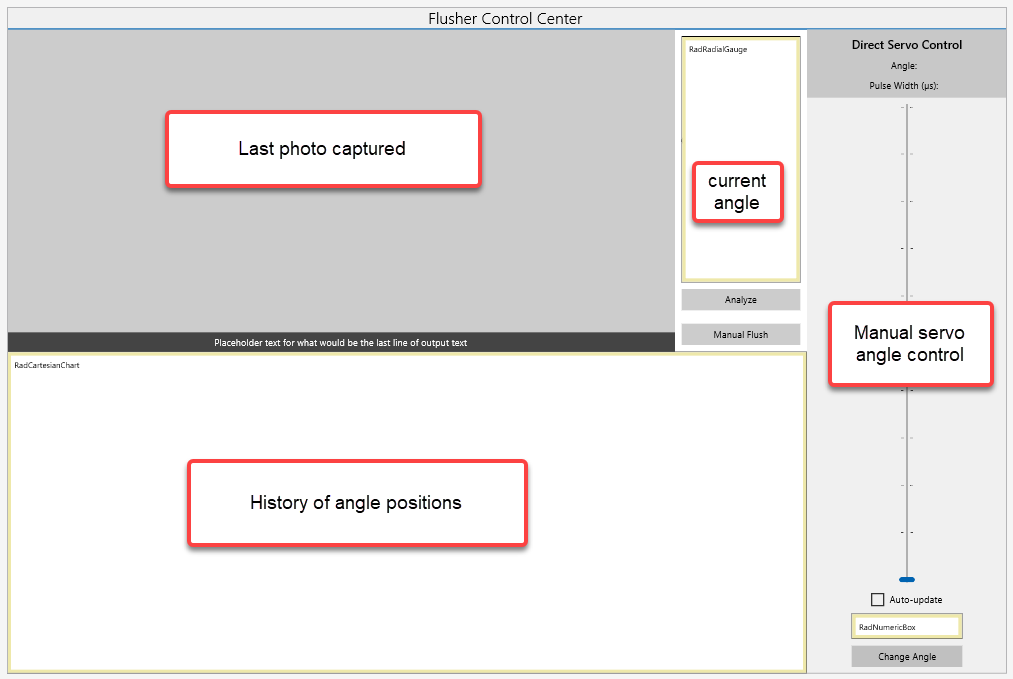
Although the Raspberry Pi isn’t going to be connected to a display in normal use, I did build out a diagnostic dashboard as an admin panel. It uses Telerik UI for UWP charts and gauges to show a history of angle changes and current angle, a slider to manually move the servo to any angle, image to see the last photo taken.
There’s one last piece to the puzzle that I haven’t implemented yet. The actual automation of taking the photo so that I don’t need the admin app to start the analyze operation. At the beginning oft this article, I mentioned using a timer or a motion sensor, I will test both approaches in V2. I expect I’ll end up using a sonar sensor like I did for this Netduino project:
Azure Storage
This is a simple reusable Azure Storage service class that implements the Azure Storage .NET SDK to connect with a blob container that holds the image files. The images are deleted after a certain period (90 days) so I don’t end up with a huge container and costs.
Azure Custom Vision & Machine Learning
If you’ve never seen azure custom Vision, I recommend checking it out at https://customvision.ai . Not only can you use the REST API, you can also download a Tensorflow or ONNX model for offline, edge inferencing. As with the storage API, I wrote a reusable Custom Vision service class to do the heavy lifting
In order to train the model, I had to take a lot of gross pictures. As of writing this post, I’ve done 4 training iterations with about 6 hours of training time. To spare you the gritty details, here’s a safe-for-work screenshot of the successful #2 detection:
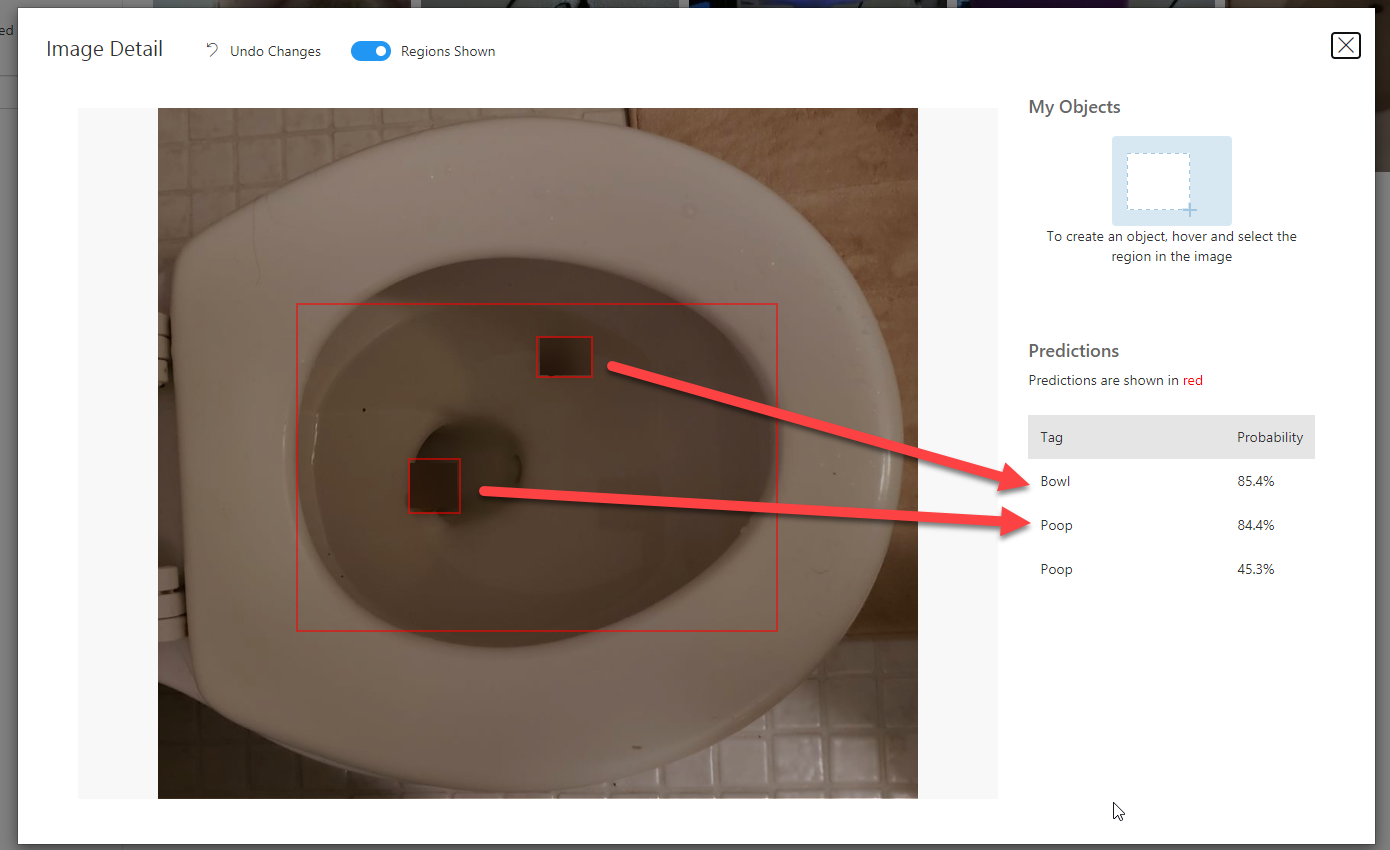
A test of the model with 85% probability for the two items in the toilet bowl.
I don’t share the endpoint details of my REST API in the demo code, but you can try out the ONXY model with Windows Machine Learning (aka WinML) because the ONYX file (flusher.onyx) is in the UWP project’s assets folder here .
Xamarin.Forms
Lastly, the admin applications. I decided to use Xamarin.Forms because I could build all three platform apps at the same time. I also prefer to use XAML when I can, this was a natural choice for me.
In a nutshell, this is similar to the Web admin portal. The app connects directly to the SignalR server and listens for messages coming form the IoT client. It can also request a photo, manually flush or request a complete analyze operation.
Here’s a screenshot at runtime to better explain the operations (to keep it work-safe, the images are only from test runs).
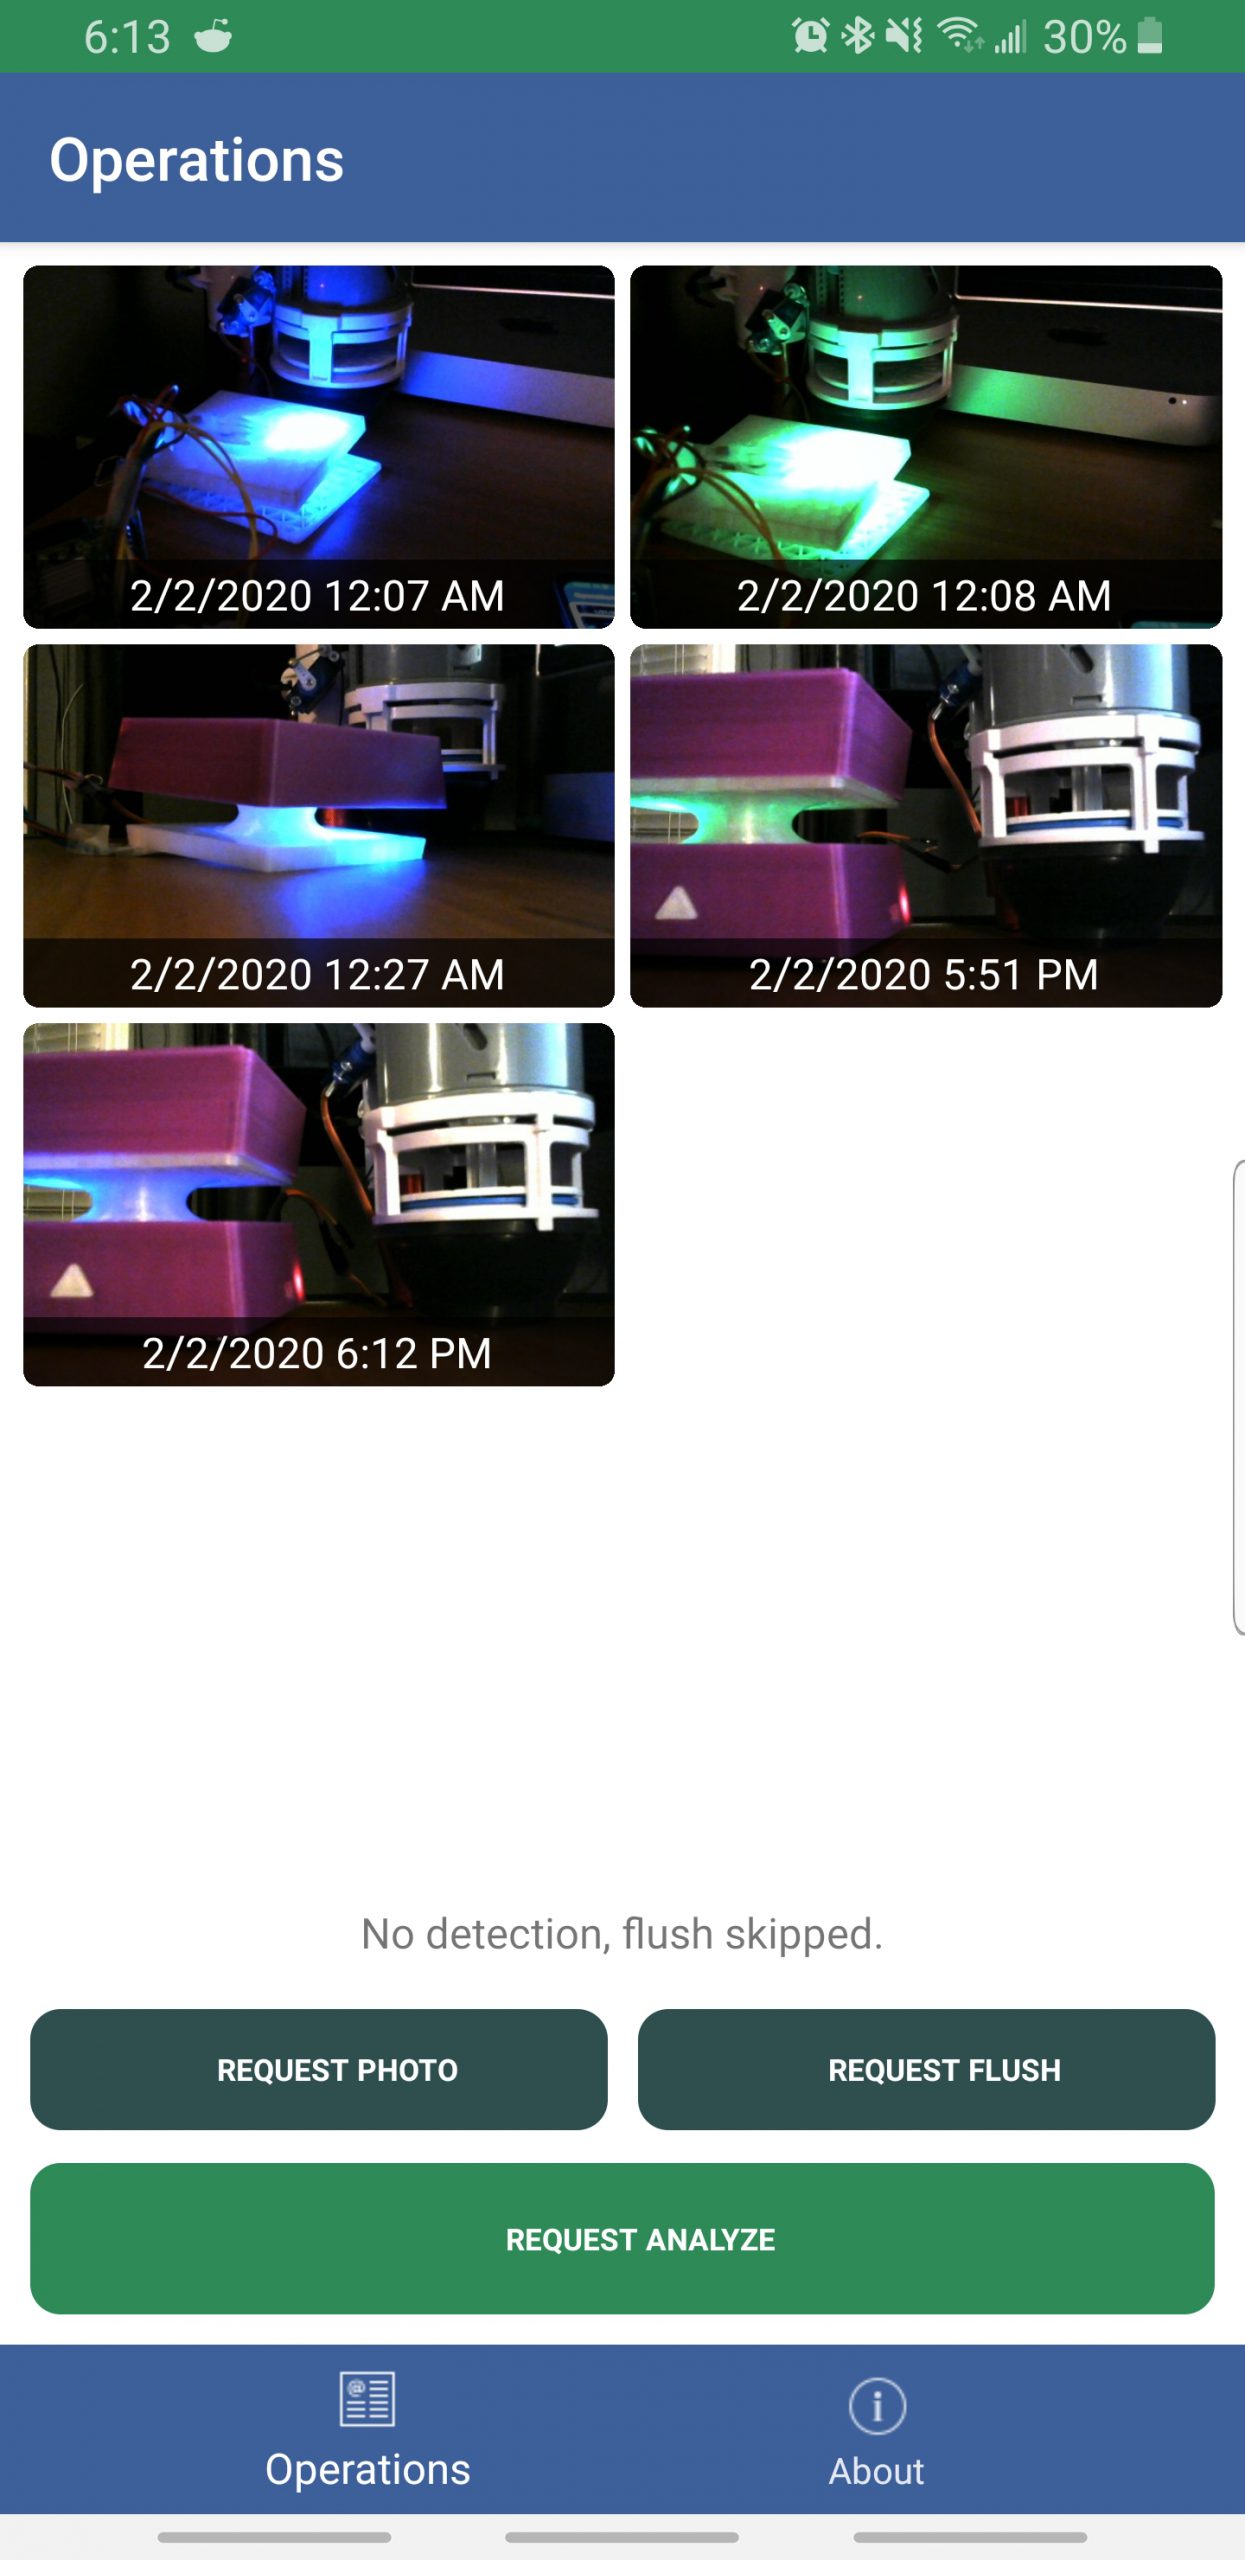
Xamarin.Forms on Android. you can request a photo, a toilet flush or a full analyze operation.
Cat Tax
Finally, the moment many of you were waiting for… my cat tax.
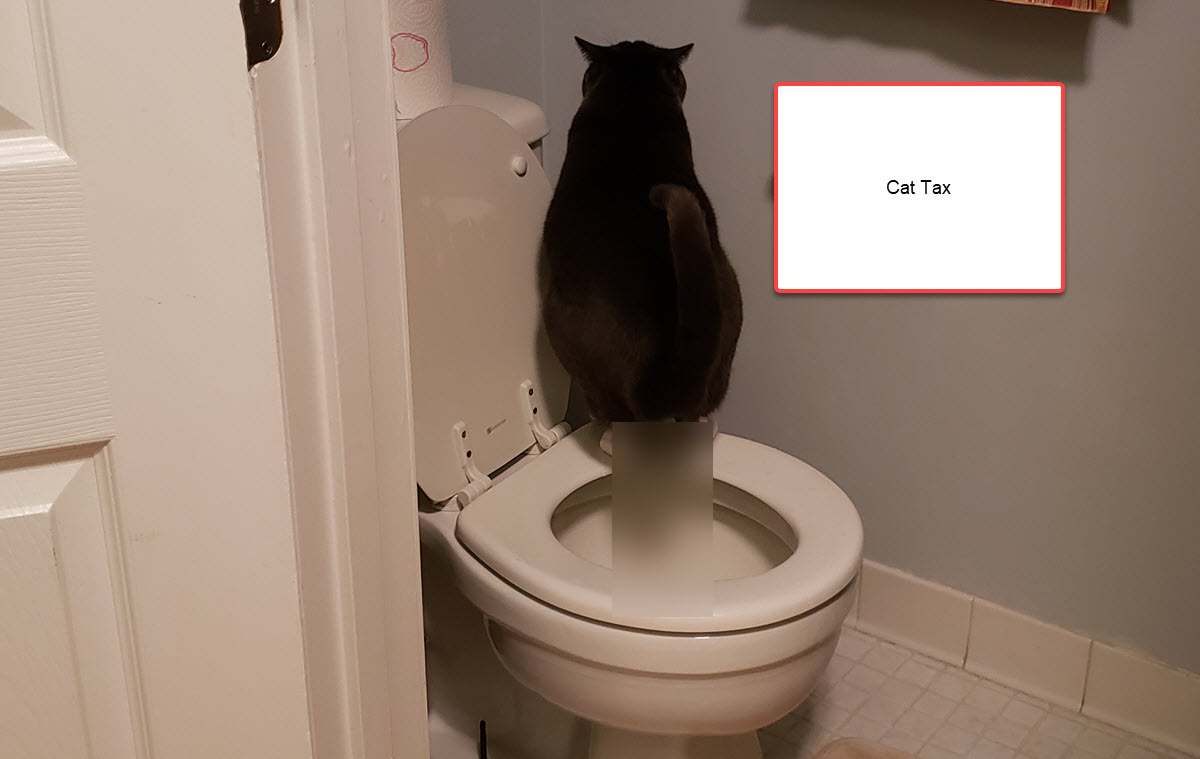
The guest bathroom that belongs to the cat and the star of the show.

