Free Yourself With DevOps
Posted on March 4, 2022 • 9 minutes • 1769 words
As you evolve as a developer, you start to venture into the world of CI-CD. This is because you want to spend more time coding and less time with the repetitive and tiresome nature of compiling for different targets, packaging and publishing.
I frequently write content about CI-CD; whether it is Azure DevOps, GitHub Actions or just a PowerShell command that does a ton of work for you. In today’s post, I’m going to take you on a journey that shows you how to use Azure DevOps to automatically build, package and publish your app to the Microsoft Store.
Understanding Terminology
First, let’s discuss terminology. What does “CI”, “CD”, “Pipelines”, “Artifacts” and “Agents” mean?
“CI” stands for Continuous Integration. This basically means when you push code changes, it will trigger a workflow/pipeline that builds your code and runs any tests. Visit What is Continuous Integration? - Azure DevOps | Microsoft Docs . The purpose of CI is to make sure that the code can be built and there are no unseen problems that arise from your recent changes. This give you freedom to only focus on the feature that you’re currently building and not worry about everything else (this is especially important when you have many developers working on the same code base).
“CD” stands for Continuous Delivery (sometimes referred to as Continuous Deployment). See What is Continuous Delivery? - Azure DevOps | Microsoft Docs . The purpose of this half is to take the code that was successfully compiled/tested, package it up and deploy it to the final destination. This destination can have multiple stages. A common setup is to first deploy to a “beta” phase for your early adopters to use, and then to the wider audience when they say it’s good.
A “pipeline” is just a set of tasks that do individual things in a specific order (in GitHub Actions, this is called a ‘workflow’). For example, you can have a pipeline that only does a quick debug build and runs any test projects. Or, you can have other pipelines that builds the project in Release mode and packages up the result in an MSIX package for distribution.
An “artifact” is simply the final result of whatever the pipeline produces (for example, if the pipeline produces an .msixupload file). These artifacts are available after the pipeline done and can be used for later stages of your system.
An “agent” is the name used to describe the computer being used to build the code (in GitHub actions, this is called a ‘runner’). The standard available agents are clean images of Windows, MacOS or Linux. They come with some commonly needed pre-installed software like SDKs and build tools. Once your pipeline is finished, this agent is recycled (think Docker containers). Note: You can setup your own computer as a “custom agent” and use that instead. This is handy when you have items you want to stay installed on the agent, like code signing certificates and Apple ProvisioningProfiles.
Real-World Example
Now, let’s dive into a real-world CI-CD system I have designed for the MVP Companion app that I maintain in the Microsoft Store. It is fully open source on GitHub MvpApi: An application for Microsoft MVPs and you can visit the project’s Azure DevOps Pipelines for yourself.
The source code contains many different types of projects, from UWP to WPF and .NET MAUI. You can have pipelines for each of them, but for this article I’ll focus on the pipelines that build and distribute the UWP project. You can see the status badges of both the CI and CD pipelines in the README.
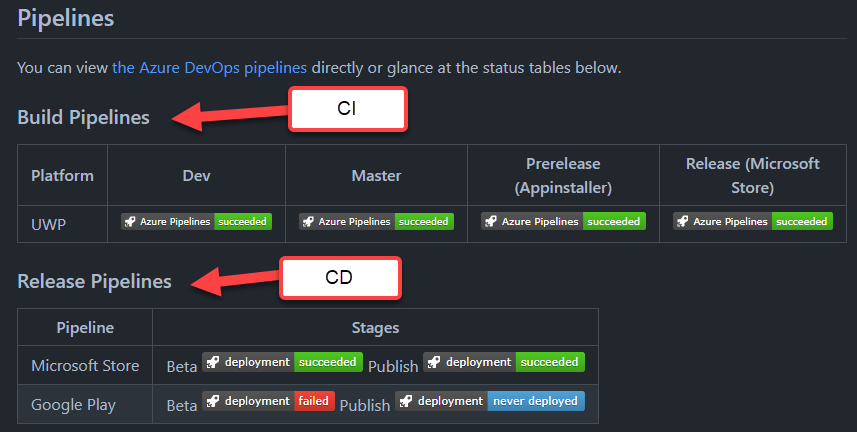
CI
Let’s start with the CI pipelines, there are 4 of them: Dev -> Master -> Prerelease -> Release. Each pipeline gets triggered by commits to a similarly named git branch.
- I only code and commit changes to the
devbranch - When I feel that set of development tasks are done, I merge those changes into the
masterbranch - When I want to push out a prerelease for my early users, I merge the
masterbranch into theprereleasebranch - Finally, when the beta testers say it is good, I’ll merge the
prereleasebranch into thereleasebranch
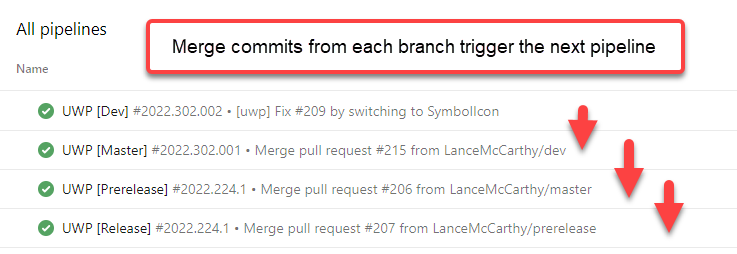
These are Build Pipelines list in Azure DevOps dashboard. This article won’t go into detail on how to setup your first pipelines, you can learn how to do that here Set up automated builds for your UWP app - UWP applications | Microsoft Docs . Rather, I wanted to explain the architecture of the setup, which achieves the end goal.
Development Pipelines
The dev and master branch simply build the code for the purposes of making sure the changes I’ve checked in are building properly and aren’t failing any tests. I do not need any publishable artifacts from these builds, so the pipelines have minimum steps to keep the build time small.
Here’s a screenshot (I share all the PowerShell and msbuild commands at the end):
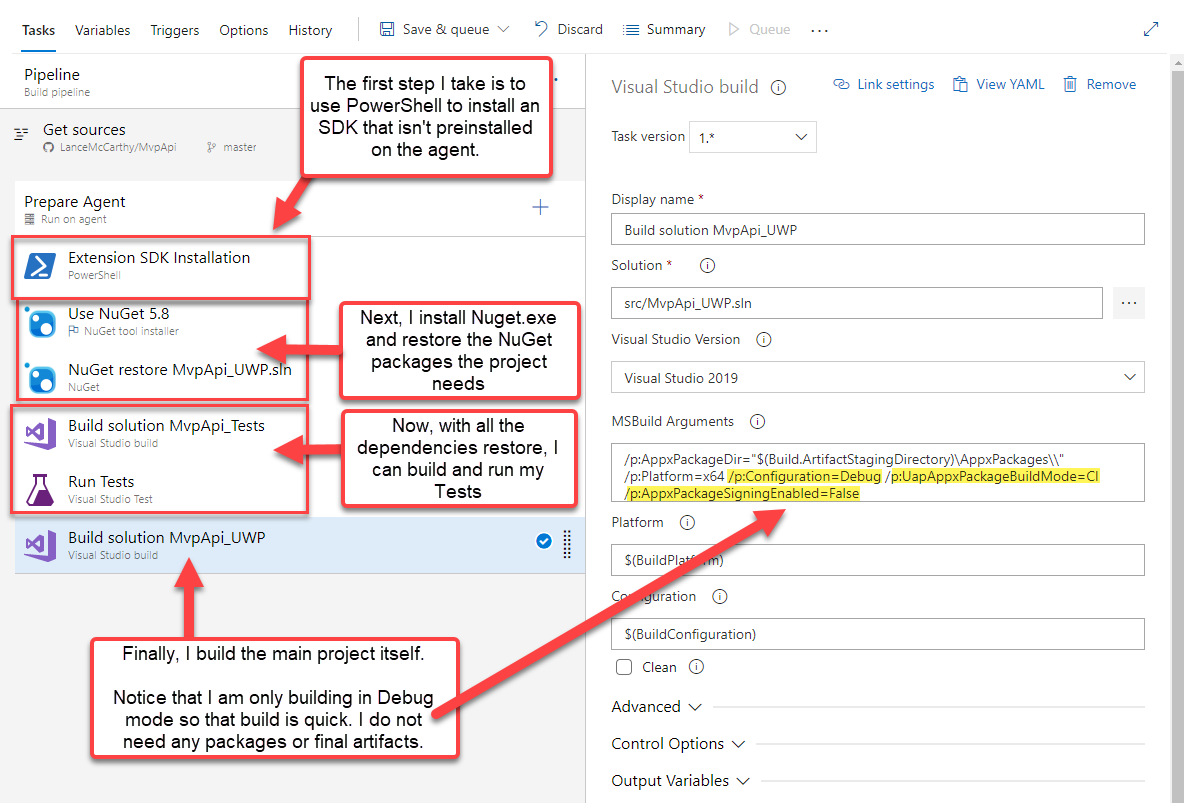
Note: You can learn more about that first PowerShell step in my other blog post on the topic Using PowerShell to Install an SDK in a DevOps Build Pipeline – DVLUP .
Prerelease Pipeline (Appinstaller/Sideload)
When it is time to actually release a new version of the app, I can simply merge the master branch into the prelease branch. This commit triggers the Prerelease Pipeline.
Here’s a screenshot, with explanations of things I haven’t previously explained:
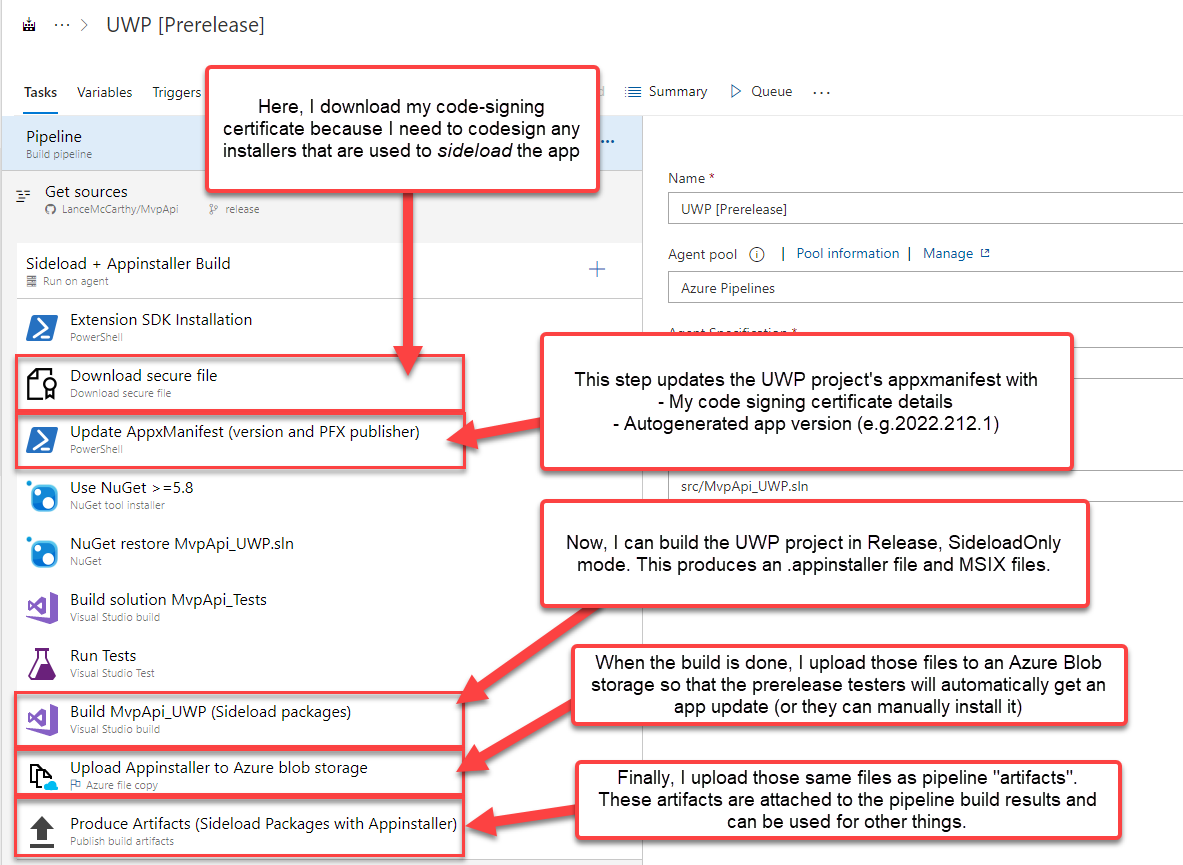
I can push as many times as I need to the prelease branch. This can be to add more features, bug fixes, etc. Thanks to the way Appinstaller works, any of my users that have it installed will automatically get updates every 6 hours. If there’s a new version on the blob, it will get installed.
Release Pipeline (Microsoft Store)
When the beta testes say “this is good!”, now I can merge the prerelease branch into the release branch. That merge commit will trigger the Release pipeline.
Here’s a screenshot of the Release build pipeline. Notice how there’s no longer any upload to Azure, because this is intended to go to the Microsoft Store instead.
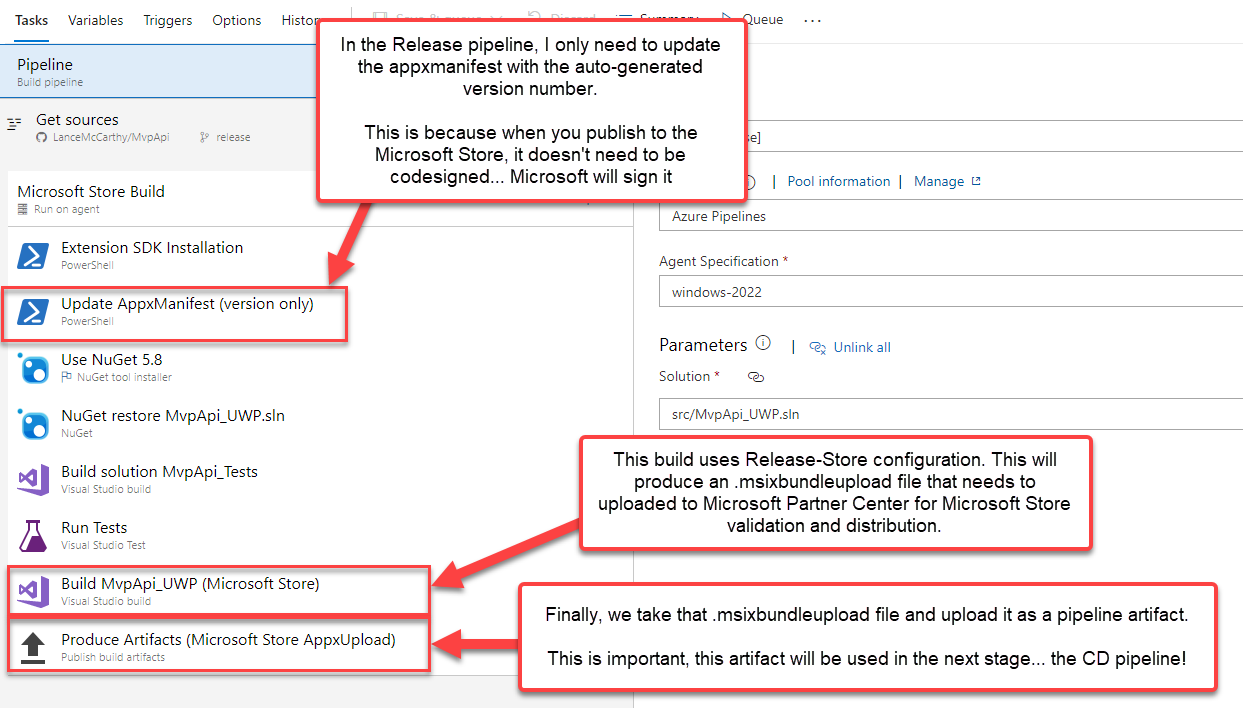
That wraps up the CI side of things. We’ve done the full lifecycle of development to release and now have an msixupload file that is used to publish a new version to the Microsoft Store.
CD
Sure, you could download the artifact file when the Release pipeline is finished, then go to the Microsoft Partner Center dashboard and manually update your app. However, Azure DevOps has Release Pipelines that can do that for us!
Note: you might be confused about some names at this point I have named one of my Pipelines “[UWP] Release”… that is a Build Pipeline, even though I gave it the name “Release”. That is different than an Azure DevOps Release Pipeline. The rest of this article will help explain the difference.
In the Pipelines menu, you’ll see an item named “Releases”, those are Release Pipelines.
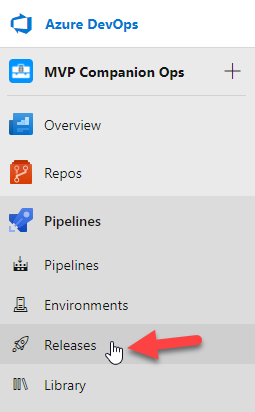
This provides you with a very different looking UI. It has a higher level view of all the things going on; an Artifacts section and a Stages section:
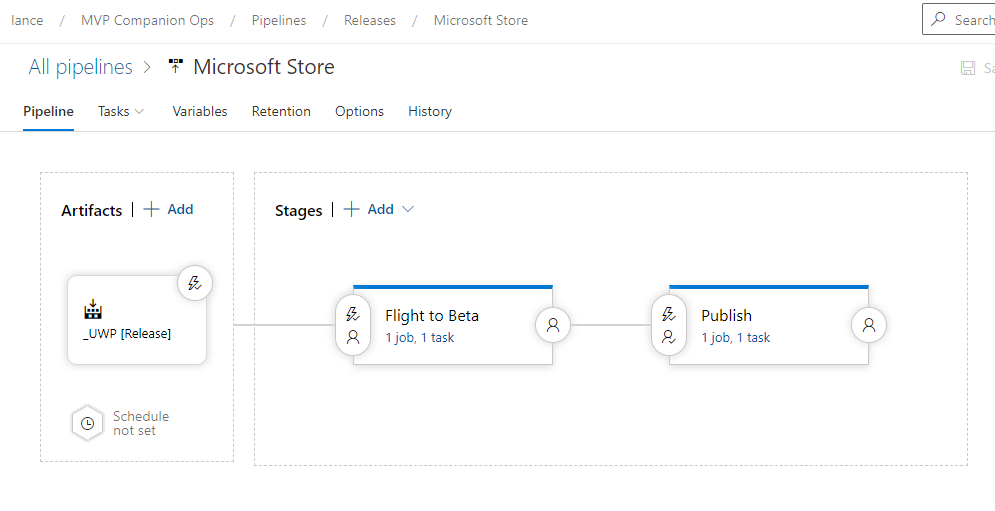
Let’s dive into those sections in more detail.
Artifacts
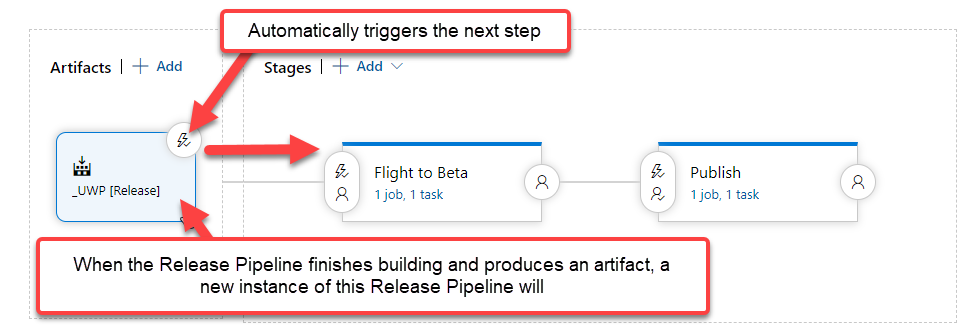
When the “UWP Release” Build Pipeline successfully builds and uploads an artifact, this will trigger a new instance of this Release Pipeline. You’ll notice how the lightning bolt icon on the artifact has a little checkmark on it. This means when the artifact is downloaded by the pipeline, it will automatically start the first Stage.
Stages
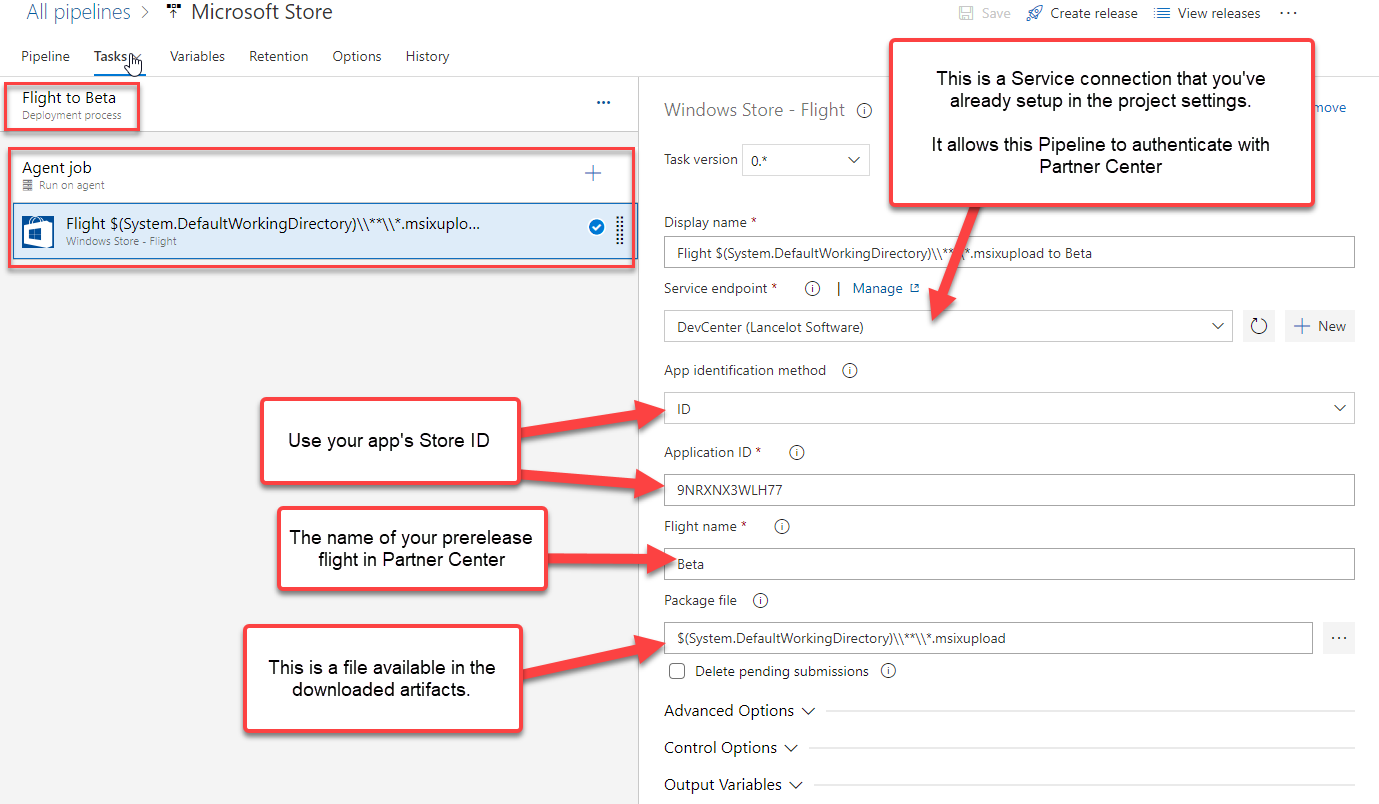
The first Stage is to upload the msixbundle upload file to Microsoft Partner Center (previously known as DevCenter) to be pushed to a flight (flights as fast-moving channels that you can release your app to a predetermined list of users quickly without waiting for certification).
You can add multiple “jobs” to each stage. If we click on the Jobs button of this Flight to Beta stage…
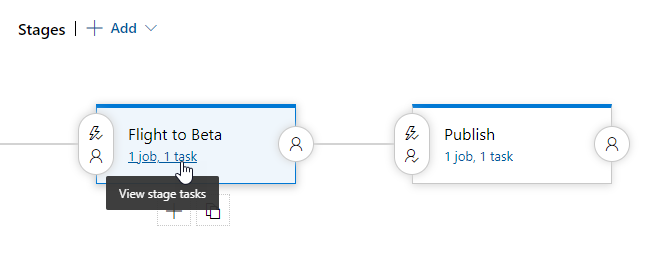
…you will get a familiar UI that looks just like a Build Pipeline’s task builder! Inside my “Flight to Beta” stage, there’s only one task… upload the artifact to Partner Center to be distributed to the “Beta” flight users.
Once the “Flight to Beta” stage is done, the pipeline will automatically execute the next step. However, what if you don’t want that to happen automatically? You can set a precondition to manually approve the stage.
In the following screenshot, you can see I have set a precondition that someone manually approves the next stage:
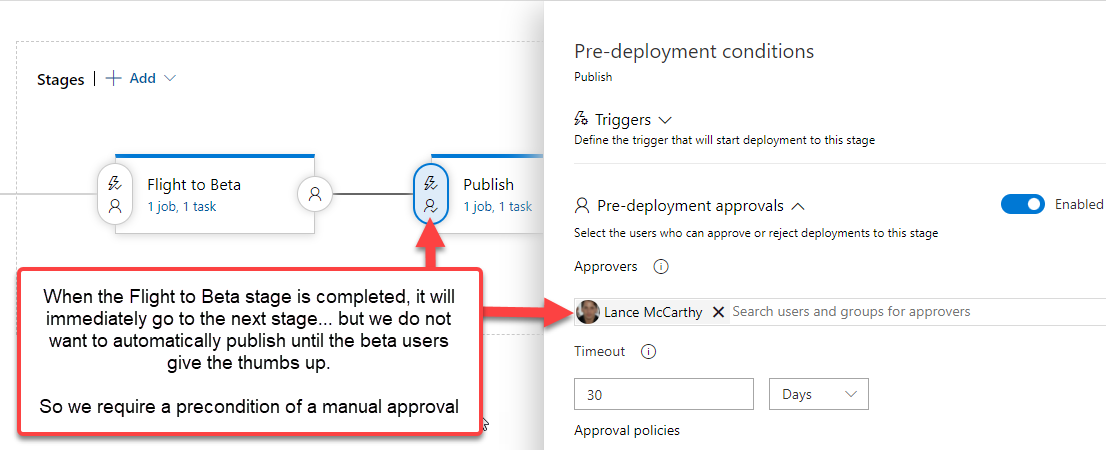
That will show a big Blue button (I don’t have a screenshot at the moment), once the button is clicked the “Publish” stage will run. That stage also consists of a single task:

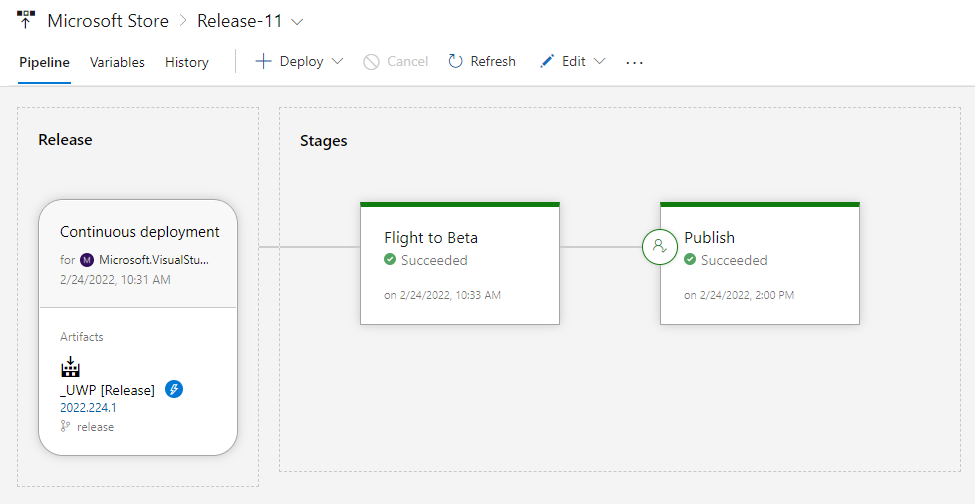
When both stages are done, that pipeline is complete. Here’s what that looks like:
Conclusion
To wrap things up, you saw that a single commit to a git branch with your work is the beginning of this lifecycle. If that “development” branch is good/stable, move it to the main/master branch. Repeat that process until you’re ready to push the application to your early adopters in the Prerelease branch.
You can go back to the dev->main-prerelease as often as you need to. Then, when your early adopters are happy, you can finally push the changes to the Release branch for the Microsoft Store users. That will trigger the Release Build Pipeline and you produce and msixupload file to publish to the Microsoft Store, to either a flight or to the general public.
I hope this has helped you streamline your development experience. This approach isn’t just for UWP app, that just happens to be my most public option that you can explore. If you want to see such a thing for GitHub Actions, take a look at my project MediaFileManager, which does exactly the same thing, but for a WPF app! MediaFileManager/.github/workflows at main.
If you have any questions, feel free to reach out to me on Twitter -> @l_ance .
Extras - Scripts
As I promised earlier, I will share the PowerShell scripts and msbuild parameters I’ve written for some of these tasks:
PowerShell: Extension SDK Installation task
$servicesSdkUrl = "https://dvlup.blob.core.windows.net/general-app-files/MSIs/MicrosoftStoreServicesSDK.msi"
$servicesSdkPath = Join-Path $env:TEMP "MicrosoftStoreServicesSDK.msi"

Write-Output "downloading $servicesSdkUrl..."
Invoke-WebRequest -Uri $servicesSdkUrl -OutFile $servicesSdkPath

Write-Output "installing $servicesSdkPath..."
Start-Process $servicesSdkPath -ArgumentList "/q" -Wait
PowerShell: Update AppxManifest
$AppVersion = "$(Build.BuildNumber).0"
$PackageIdentity_Publisher = "CN=Lancelot Software LLC, O=Lancelot Software LLC, L=NORTH BILLERICA, S=Massachusetts, C=US"

[xml]$manifest = get-content "$(System.DefaultWorkingDirectory)\\src\\MvpApi.Uwp\\Package.appxmanifest"

$manifest.Package.Identity.Version = $AppVersion
$manifest.Package.Identity.Publisher = $PackageIdentity_Publisher

$manifest.save("$(System.DefaultWorkingDirectory)\\src\\MvpApi.Uwp\\Package.appxmanifest")
MSBuild: UWP for Appinstaller/Sideload Build (x86|x64|ARM|ARM64)
-maxcpucount:20 /p:GenerateAppInstallerFile=True /p:AppInstallerUri="https://dvlup.blob.core.windows.net/general-app-files/Installers/MvpCompanion/" /p:HoursBetweenUpdateChecks=6 /p:AppxPackageDir="$(Build.ArtifactStagingDirectory)\\SideloadPackages\\\\" /p:UapAppxPackageBuildMode=SideloadOnly /p:AppxBundle=Always /p:PackageCertificateKeyFile="$(lancelotPfx.secureFilePath)" /p:PackageCertificatePassword=$(LancelotSoftwarePfx2023Password) /p:PackageCertificateThumbprint=$(LancelotSoftwarePfx2023Thumbprint) /p:AppxPackageSigningEnabled=True /p:Platform=$(BuildPlatform) /p:Configuration=$(BuildConfiguration) /p:AppxBundlePlatforms="$(AppxBundlePlatforms)"
MSBuild: UWP for Microsoft Store Build (x86|x64|ARM|ARM64)
/p:AppxPackageDir="$(Build.ArtifactStagingDirectory)\\AppxPackages\\\\" /p:AppxBundle=Always /p:UapAppxPackageBuildMode=StoreUpload /p:AppxPackageSigningEnabled=False /p:Platform=$(BuildPlatform) /p:Configuration=$(BuildConfiguration) /p:AppxBundlePlatforms="$(AppxBundlePlatforms)"
