Migrating from WordPress to Hugo
Posted on December 25, 2024 • 7 minutes • 1490 words
Table of contents
It’s been a while since I’ve written a new post. This was mostly due to an ongoing battle with trying to move my Wordpress installation from an older Windows app Service on Azure. There is a new Linux-based App Service option that can do it, but Azure requires some expensive components to support it. So, I thought why not take this opportunity to try new things?
Exporting
The first thing I needed to do was export the 10+ years of posts that already existed. This was relatively easy enough, there are many Wordpress Exporter/Importer plugins, but I liked the results from All-in-One WP Migration and Backup the most. It is free up to a certain export size. Mine was quite large (>250mb), so I needed to upgrade but was worth every penny.
After the export, it’s time to think about where to move it. I’ve tried a few things before ending up with using Hugo. I think this journey might be beneficial for you to consider, so I would like to show you how to do this first… then we’ll go through the Hugo conversion last.
WordPress via Docker Compose
I’ve been really loving running containers lately. I have a bunch of self-hosted services for personal use, running on top of some subdomains (a NAS, VPN, home automation, etc). So my first idea was to spin up Wordpress in a container.
This was by far, the most easiest, simplest way to migrate to another instance. Spinning up Wordpress via docker compose is fantastic because it lets you define both requires services in the same operation. It creates the mariadb container and the wordpress container at the same time, but also connecting them together.
Create a new subdirectory and navigate to it
mkdir mywordpress && cd mywordpressCreate a new docker-compose.yml file (e.g.
nano docker-compose.yml).Paste in the following content, save, and exit (update “change-me” before saving!).
services:
  mariadb:
    image: mariadb
    restart: unless-stopped
    environment:
      MYSQL_ROOT_PASSWORD: 'change-me-to-some-rootuser-password'
      MYSQL_DATABASE: 'wordpress'
      MYSQL_USER: 'mySqlUser'
      MYSQL_PASSWORD: 'change-me'
    volumes:
     - ./database-mywordpress:/var/lib/mysql

  wordpress:
    image: wordpress
    restart: unless-stopped
    links:
    - mariadb:mysql
    environment:
      WORDPRESS_DB: "wordpress"
      WORDPRESS_DB_PASSWORD: "change-me"
      WORDPRESS_DB_USER: "mySqlUser"
    ports:
     - 82:80
    volumes:
     - ./html-mywordpress:/var/www/html
Run this command
docker compose up -dDone!
You can now go to http://localhost:82 and see the initial setup experience for WordPress. After initial setup, install the same plugin you used to export the site and use its import feature.
Docker Compose Notes
- The
docker compose upcommand will pull any missing images before starting the containers.- If you want to update anything, use
docker compose down, thendocker compose pull, finallydocker compose up -dagain.
Self-host & Reverse PRoxy
Now that you have this running on localhost, how do you expose it to the internet safely? I personally recommend using nginxproxymanager . It is a fun and easy to use reverse proxy with HTTPS, SSL and automatic LetsEncrypt support. You even use docker compose to set that up, see the Quick Start docs. Then port forward 80 and 443 in your router to the nginxproxymanager and you can have as many self-hosted, HTTPS enabled sites as you want.
See this real running example => https://vma.care/ . Would you believe that it is running on a Raspberry Pi 4! It’s much faster than it ever was on an Azure Windows App Service.
GitHub Pages & Hugo - Trying Something New
So, why am I writing about Hugo if WordPress is working so well on Docker? The problem I have is with an unreleated technicality with TLD routing in a reverse proxy environment that I originally designed only for subdomains. So, I considered alternate solutions where I didn’t need to have my own reverse proxy for this site.
I instantly thought about using GitHub Pages ! Unfortunately, you cannot run WordPress on GitHub Pages because Pages supports only static site content.
I started looking around for good blogging static sites and came across Hugo ! Some items immediately caught my attention:
- It has a HUGE range of styling options and themes => https://themes.gohugo.io/
- You can write content using markdown => https://gohugo.io/getting-started/configuration-markup/ (I prefer using markdown instead of WYSIWYG editors)
- It works perfectly with GitHub Pages (commit -> GitHub Actions -> your site gets instantly updated).
For completeness, yes, GitHub Pages does support WASM , but WASM is outside the scope of this post.
Conversion
Now that I have decided on what kind of site and theme I want, I need to figure out how to get all my WordPress content into Hugo. The good news is Hugo knows this is a need and maintains a list of migration tools at https://gohugo.io/tools/migrations/ . Under the WordPress section , we see four different options.
I used the wordpress-to-hugo-exporter one. It worked great for me, see the README for more specific details to understand how you might want to use the tool.
After the conversion, I did have to mnake some small tweaks because some of the URLs in my blog were hard coded to HTTP links… but this is a simple Find & Replace option. Or you can just make sure any HTTP links are always redirected to HTTPS (a setting in GitHub)
GitHub Actions & GitHub Pages
Now with the site’s content done, it’s time to configure the workflow that actually published the site update whenever there is a commit to the main branch.
The fastest and easiest way to do this is to have GitHub Pages settings create the workflow file for you.
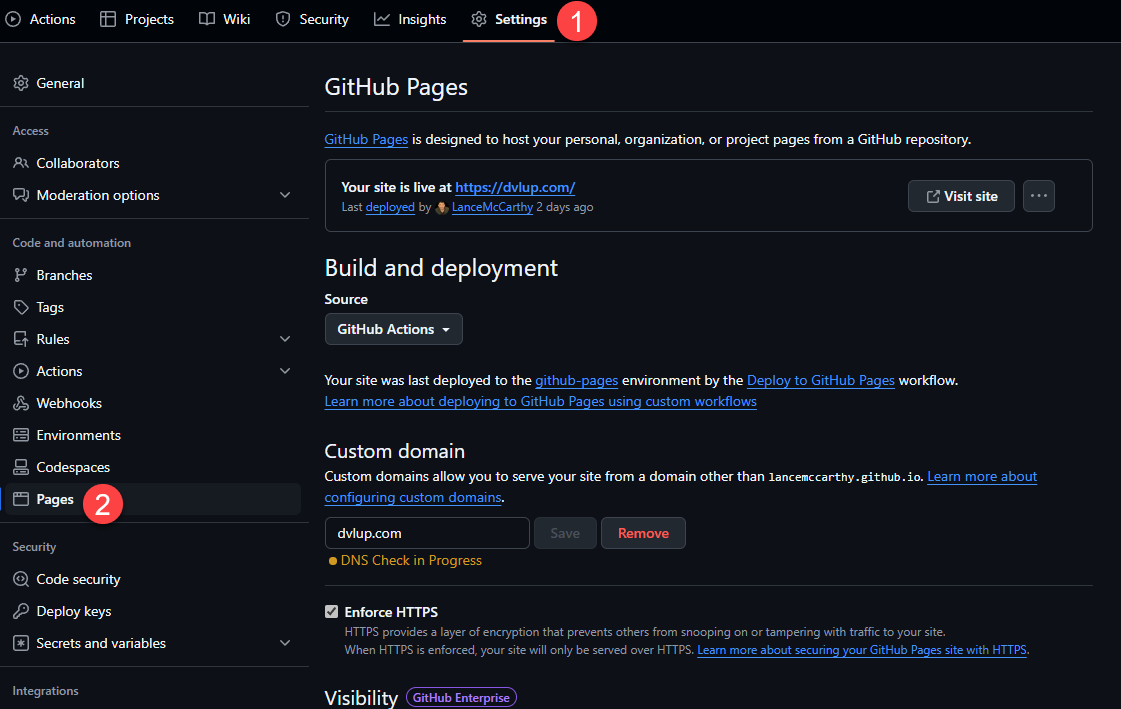
- Go to Settings, then select Pages.
- Follow the instructions to setup the site and configure your domain’s DNS setting. You can look at my hugo.yaml workflow file for reference.
- Enable Enforce HTTPS to avoid any problems with any links from WordPress that are hard-coded to http.
When you’re done, it should look something like this:
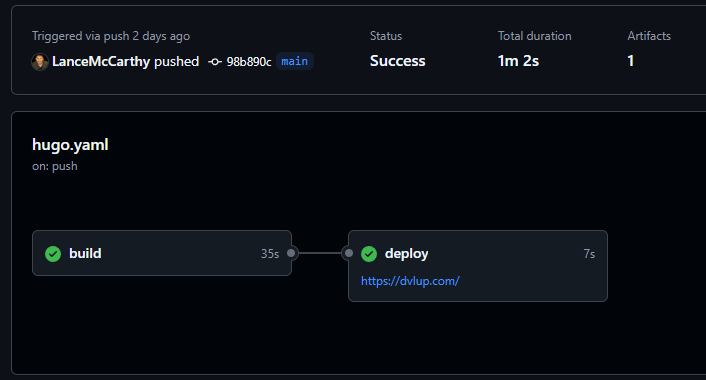
When you make a new commit to the triggering branch, the workflow will be executed by GitHub Action and your page will get updated. Here is what it looks like after one of my runs:
Tips
There are some tips that may (or may not) be relevant for your journey.
Image Root URL
You might be tempted to change where all your images are stored, but this will break all of your existing blog post’s links to those images. On WordPress, the root URL for images would usually be domain/YYYY/MM/image.png, but it was probably exported to /wp-content/uploads/YYYY/MM/image.png.
You can think of this wp-content/uploads folder as the same thing as the static folder of the Hugo site. Any file in the static folder gets resolved directly on the root of the site. I would look at how all the image links are in your posts and make a decision to keep the wp-content prefix or move the year folders to the static folder.
In my case, I made sure the image links lined up with the full path, but I plan on trimming that down to only use the static folder.
Image Size Suffixes
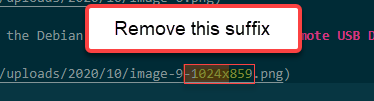
Sometimes WordPress will put a size suffix on your image file names in the blog post content. For example, an image link in a post might be linked to MyPic-1024x715.png, but the actual file name is MyPic.png. The easiest way to find these for a quick fix is to search for the common dimension, then remove the suffixes as you go.
In my case, it was 1024 width, but varying heights:
Code Blocks
You might have some lingering <pre> or [sourcecode language=""][/sourcecode] blocks that held code examples. Consider spending a little bit of time changing them to the three-backtick block.
Before
public string FirstName { get; set; }
or
public string FirstName { get; set; }
After
public string FirstName { get; set; }
It gives you great code coloring and formatting. You already saw some YAML examples above, here’s what it looks like for C#
public class Person
{
    public string FirstName { get; set; }
}
For more examples, see my Using IoT, SignalR, Azure Custom Vision to Flush a Toilet for a Cat post.
Escape Characters
I’ve found that many of my code blocks had escape characters still in there from WordPRess’s HTML conversation. For example, Los\_Angeles is supposed to be Los_Angeles or inside code blocks \[SomeAttribute\] is supposed to be [SomeAttribute].
Consider using a Find & Replace action here as well for the following:
\_to_\[to[\]to]\-to-
Note: Avoid using a Replace All, some might be legitimate escapes. It is usually in code blocks that they shouldn’t be there.
Sanity Check
Finally, my best piece of advice is to consider when you might want to stop making manual tweaks in old irrelevant posts. For example, before 2014, I stopped fixing XAML code blocks for Windows Phone posts… I only fixed broken image links. While you still want the history and pictures, the code is no longer useful unless it is teaching a lesson that can be agnostic of the deprecated platform.