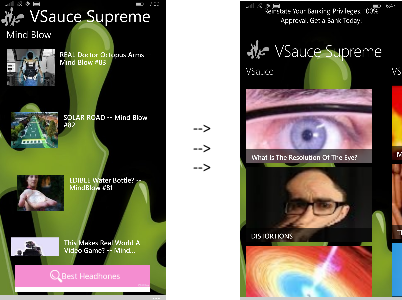
If you’re like me, you like to fiddle and tweak things to get just the right result. Recently, Microsoft has really beefed up App Studio apps and if you explore the downloaded source code you’ll see a new Universal app structure leveraging MVVM. Let’s start with the before and after photo (click any image to view larger):
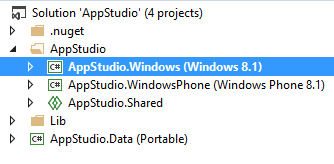
Here is a screenshot of the App Studio solution structure in the Visual Studio Solution Explorer (since AppStudio.Data is a Portable Class Library, you’ll need Visual Studio 2013 Pro [Update 2] or higher. See Tim’s answer for a workaround):
So, you’ve got yourself an App Studio app and want to make custom changes, this can be challenging because you won’t see anything in the designer because the data is not generated until runtime. You’ll have to make educated guesses by using margins of the UI elements. We can make this much easier this by creating design-time sample data.
This blog post is a tutorial on how to do just that. Keep in mind that even though I have the YouTube schema through out the app, it should work the same regardless of your app’s structure. Let’s get started…
Step One – Download and open the source code in Visual Studio 2013
You can find the source code’s download link on the same page you downloaded the publish package. By default, it is collapsed, just expand the “Source Code” section and click the “Download 8.1 Source Code” link. It is a zipped folder, unblock and then extract it. Once the app is open in Visual Studio 2013, Build (F6) the solution so that the nuget packages are retrieved and added.
Step Two – Generate Sample Data
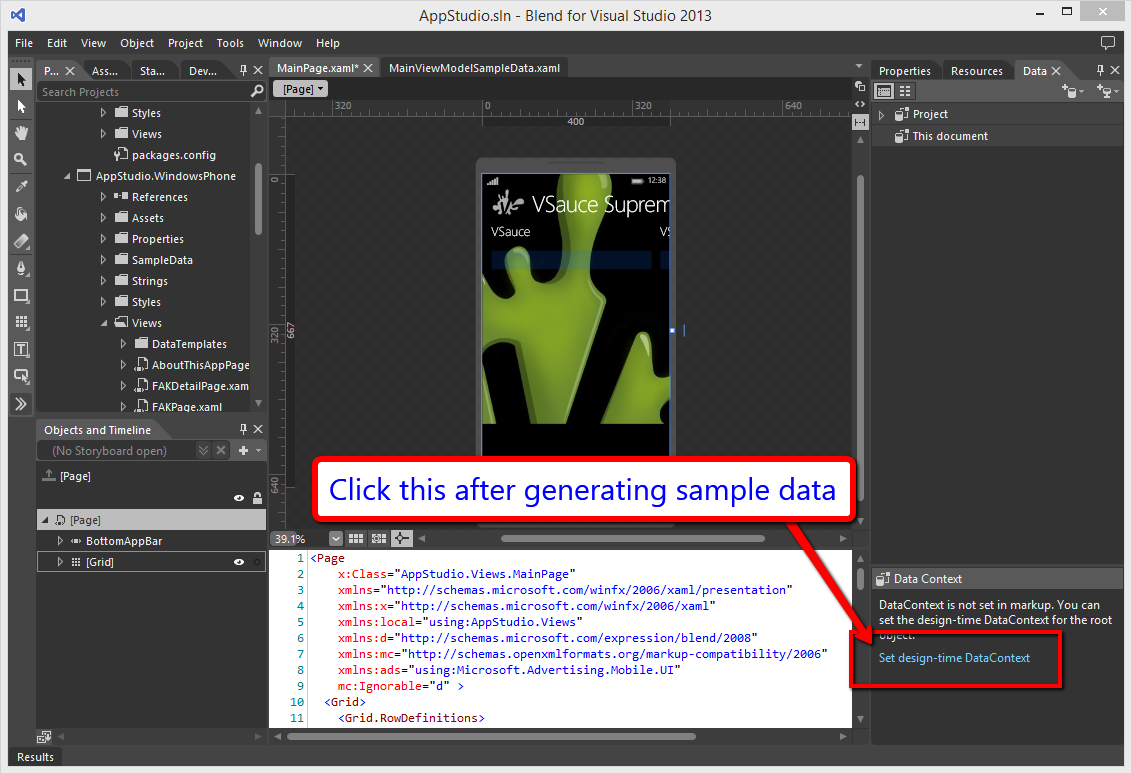
Now let’s open the project in Blend for Visual Studio (Pro Tip: right-click on AppStudio.WindowsPhone/Views/MainPage.xaml and select “Open in Blend“) so that we can generate sample data for MainViewModel.
- 0 – Prerequisite: See my blog post here and review Step 3
- 1 – Open MainPage.xaml located inside AppStudio.WindowsPhone/Views in Blend. Note: Click “Cancel” when Blend asks if you want to set a Resource Dictionary for design-time. (FYI – these steps are the same for AppStudio.Windows project, which you can do after completing this Windows Phone tutorial).
- 2 – Now create sample data for MainViewModel (Step 3 in my tutorial will show you how to do this) and “Save All” when it’s done.
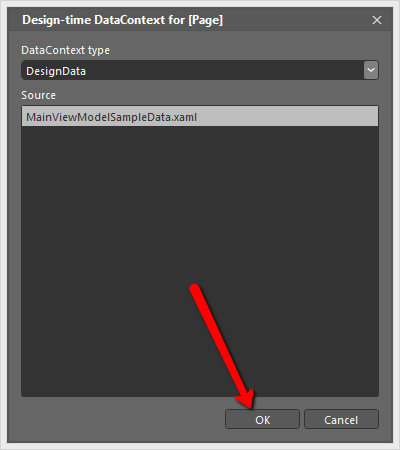
- 3 – While the Data tab still open, click the “Set design-time DataContext” link at the bottom, make sure “MainViewModelSampleData.xaml” is highlighted and then click OK. See the screenshot below. ( Alternatively, you can simply add this line to the top of your MainPage.xaml with the xmlns declarations: d:DataContext=”{d:DesignData /SampleData/MainViewModelSampleData.xaml}” )
Now your MainPage’s design-time DataContext is set to the sample data. Next, we’ll edit the sample data with some image paths so that you can see an images in the designer.
Step Three – Images
One downside to automatically generated sample data is that sometimes you want a path to an image instead of Lorem Ipsum. This is very easy fix that makes life much easier in the designer because Image controls bound to that sample data’s property will show an image, here are the steps:
- 1 – Add an image to your project (note: I created a “PlaylistIcon160.png” image and added it to the project’s Assets folder).
- 2 – Open the sample data file, MainViewModelSampleData.xaml (you’ll find it under AppStudio.WindowsPhone/SampleData/, also you’ll want to change your tool window to the XAML-only view because you cannot edit sample data with the designer-only window ).
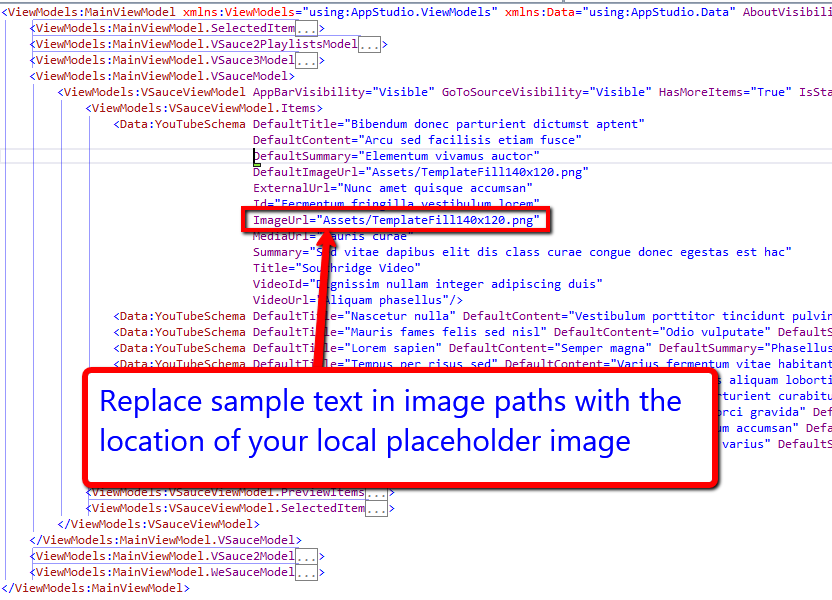
- 3 – Find the places in your sample data that are for image paths and replace the lorem text with the image path. For example in my sample data, I have the YouTube schema, which has a property named “ImageUrl” in the Items list, I changed the sample text to the placeholder image’s path. Here is a screenshot of where you’ll find the ImageUrl property and my edit to it:
- 4 – I did this for every ImageUrl property in each of my project’s models in the sample data. This is the most lengthy process of getting the sample data ready, but it’s really worth it to have images visible.
- 5 – Once all items have been edited, do a Build (F6).
Step Four – Setting d:DataContext
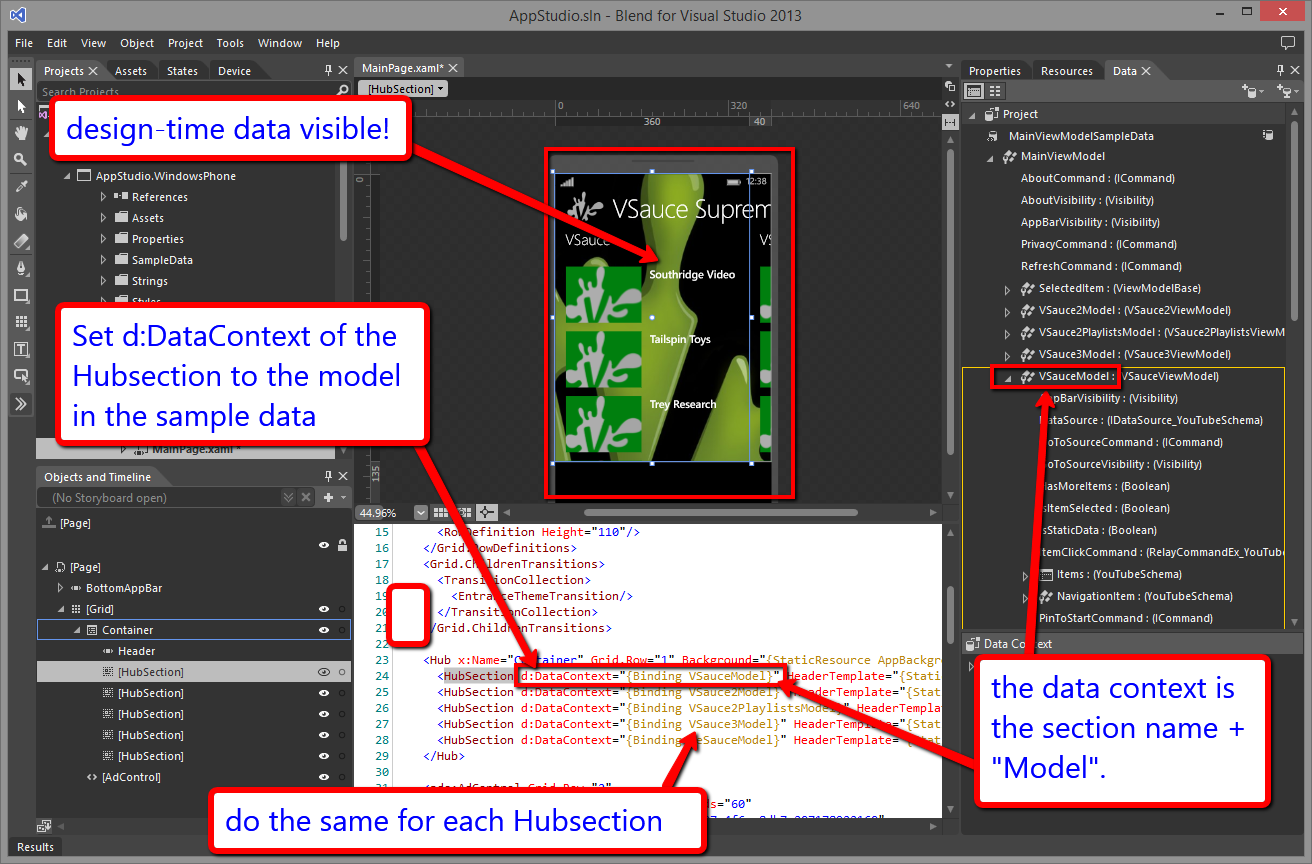
Now we need to set the design data context of your view items to point to the sample data. We already did this at the page level in step two, but we’ll need to set it for each HubItem to display the lists. Here are the steps:
- 1 – Go back to MainPage.xaml and go to a split view (XAML and designer visible).
- 2 – Scroll down until you see the <Hub> control. You’ll see a number of “HubSections”. Here is what you should see now:

Now, add a d:DataContext=”{Binding ModelNameHere}” to each HubSection. You will find the names in the MainViewModelSampleData tree. In my demo, there are 5 HubSections, each has it’s own model. (App Studio models are outside the scope of this article, but you can read more here on the App Studio website).
This screenshot explains it more clearly:
That’s it! You should now be seeing your images and sample data in the designer.
Step 5 – Editing DataTemplates
This is the same process as you do for editing any Template. I wanted to quickly cover it to round out this tutorial. I wanted to get rid of the extra space between items in the list because I don’t have the summary text. Here is what I did:
- 1 – In the Objects And Timeline pane, expand the Hub control and right click on a HubSection
- 2 – Select “Edit HubSection“. The Objects and Timeline focus will shift to the DataTemplate of that hub section.
Now let’s edit the ItemTemplate of the ListView that shows the list items:
- Right click on ListView
- Expand “Edit Additional Templates“
- Expand “Edit Generated Items (Item Template)“
- Select “Edit Current“
You can now edit the template, I removed the second Grid.Row declaration because it wasn’t being used. I got back 60 pixels on unneeded padding, but remember empty space is just as important as content. So, I added a 12 px margin to the bottom of the Image control. This now allows more items to appear on the smaller phone form factor.
Conclusion
With a little sample data and some independent flavoring, you can customize your App Studio app to give it a truly unique feel. You can see the results of having design-time data right now, here is the app I used in this demo, enjoy!
Here is the Windows Phone version of the customized app
Here is the Windows version of the customized app
Now, go forth and design away!
2 thoughts on “App Studio – Design-Time Sample Data”