I have stopped by the Unraid website several times, longing for those the features on offer… like Charlie looking into Willy Wonka’s front gates imagining the wonders that lay beyond.

However, I got scared off each time when I read the setup instructions and never took the next step to implement it. I wish I had done this sooner, it was really easy… literally plug and play (with a couple button clicks to confirm I wanted to format the drive 😊).
This weekend, I took the plunge and captured every step for this tutorial so that you can see just how easy and not scary as it first appears. This post is a step by step tutorial on how to take all the drives you’re using with openmediavault (OMV) and use them to setup a new Unraid system.
Preparing Unraid
The first thing you’ll want to do is get a USB2 or USB3 thumb drive with at least 1GB capacity (USB2 is better). Clean out the contents of the drive and name it “Unraid”, this is going to be your boot drive. Unraid is actually loaded into the system’s RAM during boot and runs from there, so there is very minimal boot disk IO.

Next, download the USB Creator software from the Unraid Downloads page. Plug in the USB drive and then run the USB Creator and flash the USB drive.

The USB Creator does all the heavy lifting for you. No CLI and manual disk management!
Booting Unraid
Unlike openmediavault, which runs inside another OS, Unraid is an OS. Thus, we will be booting from the USB drive. You can choose just about anything to run Unraid because it’s Linux based. Folks are using it directly dedicated NAS hardware, and more. See the BIOS and Booting Up section in Unraid Getting Started docs for system config requirements.
My openmediavault is running on a Raspberry Pi4, I can’t use that for Unraid. It’s not just technically problematic, the whole reason I’m moving to Unraid in the first place is to beef up my NAS and get nice features like VMs!
So, I looked around my “old laptops” bin and found the perfect host, a Dell Latitude E6430 from 2013 that has USB3 and eSATA ports. Even better is it has an Intel i7 with virtualization support.

Now that I have a machine to use, it’s time to set the BIOS’s boot order so that the USB is selected. Here are the generalized steps:
- Plug the machine into your network with a cable (you can setup wireless later)
- Start up the machine and enter your BIOS settings (it’s usually F12, F2 or F1)
- Look for a “Boot Order” option in your BIOS (this is a bit different for every manufacturer, but it’s not too difficult to find)
- Make sure “USB” is set to boot before “HDD”
- Save the settings and power off the machine
- Plus in the USB boot drive into an open USB2 port. (Tip: Try and use a USB 2.0 port for the boot drive, this will save USB 3 ports for NAS drives).
TIP – If you’re using USB for your NAS drives and not SATA, then make sure you plug them into USB 3.0 or 3.1 ports. If you’re not sure, consult the machine’s manual to know which ports are managed by USB 3.0 Hubs. If you have multiple USB 3.0 hubs, you can spread them out to get faster disk IO instead of putting all the work on one hub.
It’s Showtime
Alright, it’s time to power up! Make sure the USB is plugged in (see step 6 above) and power on the machine. You’ll see a boot menu for which option to choose, just let it make the first selection: Unraid OS (see Boot Mode Selector for descriptions of the options).
Unraid will start headless and you’ll see a bunch of Linux and Unraid initialization output. Wait until you get to the end and see the CLI ask for Tower login, you’re done. The server is running and now it’s time to go to the webpage.
Go to a different computer, open the web browser and navigate to https://tower (if you’re on a Mac use https://tower.local instead). You will be redirected to the tools/registration screen:

Click the “Get License Key” button and it will automatically register it for you, no long registration forms or emails or your first born son…
Assigning Drives
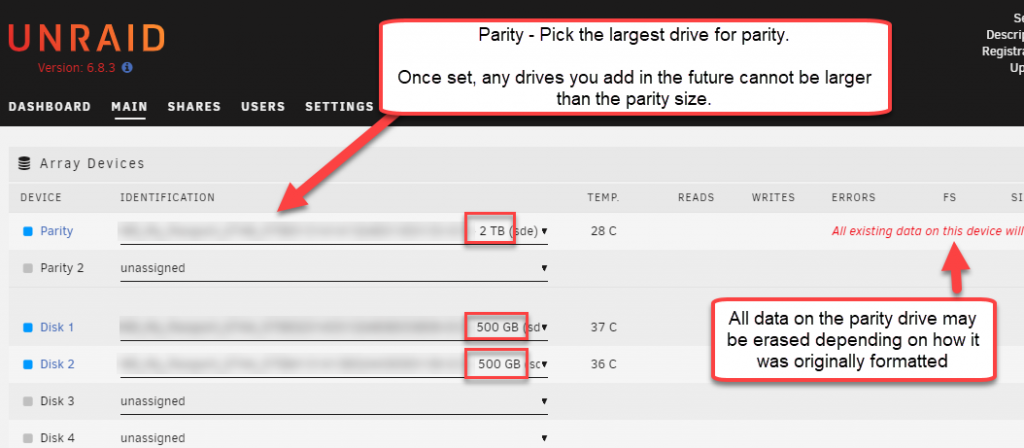
Now, on the Main tab, you will see all the slots available for drives. Please fully read the Assigning Devices to the Array and Cache documentation before you initialize the array because you can lose your data if you’re not paying attention and start pushing buttons all willy-nilly.
In openmediavault, I currently have ~6 TB of data with four 8TB drives and an assortment of 500 MB and 2TB drives. I didn’t want to take a chance with the primary data until I was comfortable with using Unraid and watching what happens after each step.
So I decided to try my first run with setting up the array with the 2TB HDD as my parity drive and the 500MB drives in the array. When I move over the 8TB drives, I will need to use one of them for parity because the parity drive needs to be as large as the largest drive in the array.

TIP – If you just plugged in a new drive and don’t see it, switch over to the DASHBOARD tab and then back to the MAIN tab. Now you’ll see the drive in the drop down.
Cache Drives
Additionally, after I add the 8TB drives, I’ll use a 500 MB disk to act as a Cache drive. This improves the array’s performance. Additionally, if you use an SSD in the cache, it can be used for SSD-based Cache for VM performance boost.

Important Information
It’s critical to understand that when you add a new device to disk or cache device slots will appear as ‘Unformatted‘ and will be unusable for storing files until you format them.
This means that if you’ve never used that disk with Unraid before, you will lose any data stored on it. Make sure you have double-checked the disk and any important files have been copied off that drive to a drive still connected to openmediavault.
Starting the Array
Once you’re done assigning disks, it’s time to start the array. I want to mention again that once you start the array, you’ll be presented with the option to format the new drives and any data on them will be lost.
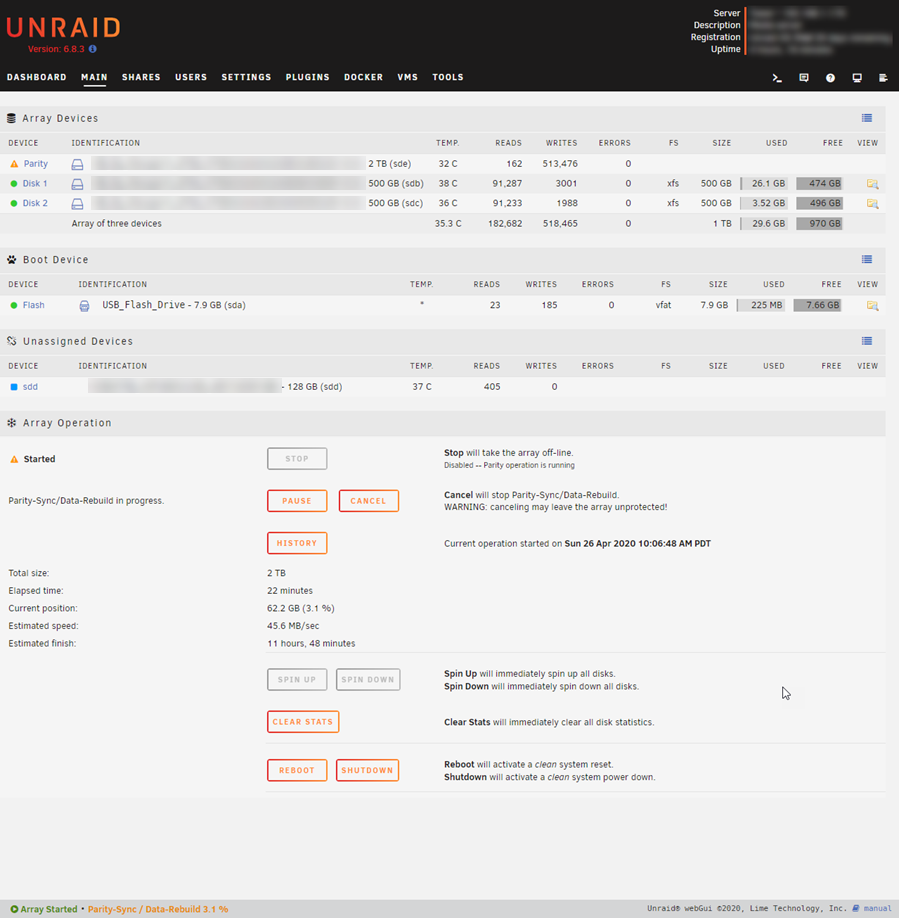
The first thing that happens is the parity drive will start working right away and building parity. This initial parity build can take a while depending on the size of the drive you used.
The other two drives are going to show up as being unable to be added to the array because they’re not formatted. Underneath the Array Operation section, you’ll see a checkbox and an orange button that lets you format the new drives.


Once the partition and format is done, you’ll see something like this:

Transfer Data
The final step is to move the data that is still on openmediavault’s drives over to Unraid. The easiest way is probably just to create share folders that match the ones you have on openmediavault.
As an example, below I create a new share named “omv_transfer”


By default, the share will be visible as an SMB share. You can change these settings to your preference:

Finally, now I can copy over the files from openmediavault’s shares (which I have mapped as network drives)

Note: For the folks who are raising their hands to get the attention of the teacher to say “buuut waaait, I can do x, y, z to move the data faster“. Depending on your capabilities and equipment, you might have other means to copy data from one disk to another that would be faster than moving files from OMV share to Unraid share. The option I show is the easiest for the rest of the class to follow.
Rinse & Repeat
The one last hurdle is to get the files from OMV into the Unraid disks. If you think about this carefully ahead of time, you can do it in less steps.
Let’s say you have 50% space free disk space on openmediavault. Think about where those files are. If you could move those files over to least amount of disks, the more disks you can move to Unraid in the first transfer. Then, you only need to make one copy operation and move the rest of the disks after.
However, if you dont have a nicely split amount of disks and files, then take your time and move files over until the next OMV disk is free. Then, move that newly opened disk to Unraid array and rinse & repeat.
Wrapping Up
Since we’re dealing with disk drives here and not RAM, this can be a time consuming operation when moving the data over during the migration (though, if you have an array of M.2 SSDs, you could be done by the time you’re done with that coffee you’re drinking while reading this).
However, once you’re done and all the disks and files are in the Unraid array, you can sit back and gawk at that shiny upgrade you just gave yourself.
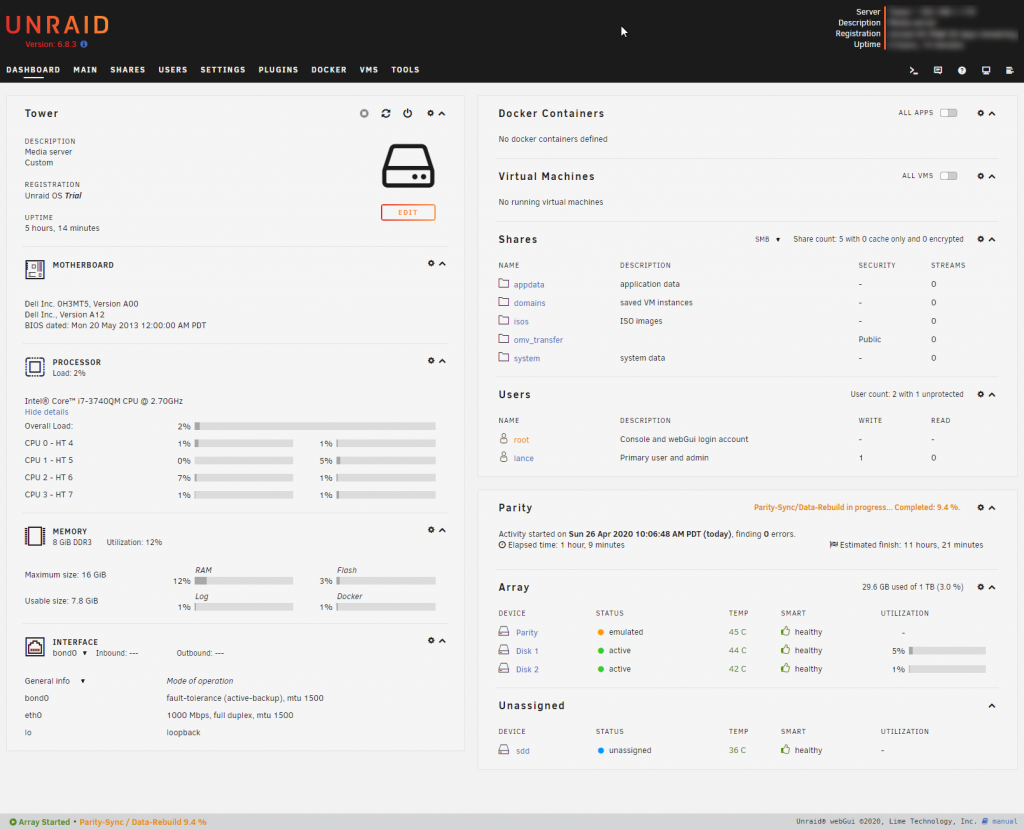
Just check out this awesome dashboard… and I don’t even have all my drives, plugins or VMs setup yet!
