I wanted to be able to have my office shades go up or down automatically, depending on the amount of light outside. Then I thought, why not take it to the next level with Windows IoT? I could design a UI with the help of the recently open-sourced Telerik UI for UWP and also leverage a FEZ HAT’s & Raspberry Pi 3 to drive the motors, detect light levels and temperature.
Why would I want to also measure temperature? Because if it were too hot inside, I wouldn’t want to open the shades even if it were light outside.
I’ll go into detail about the software and hardware, but before I do: here’s the GitHub repo with the source code and lets watch a short video of the UI animation and motor in action.
About the Hardware
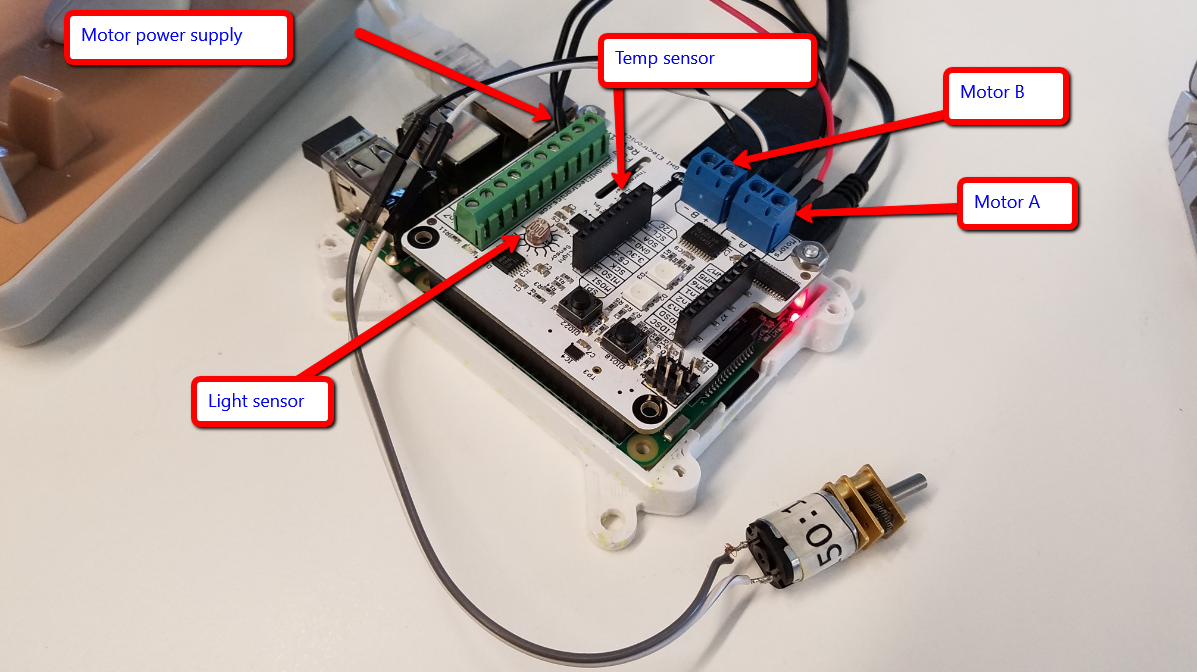
The hardware you see is a Raspberry Pi 3 (can also be a Pi 2), a FEZ HAT, and a 90 degree motor (like this one). That motor is connected to the FEZ HAT’s Motor A connection, however I also have a second smaller 1:150 motor connected to Motor B (I am still testing out torque of different motors to see which is small and powerful enough to raise a shade).
The FEZ HAT has a great built-in motor driver so that you only need to connect a more powerful external power source to drive the motors. This is the two black wires you see connected to the FEZ HAT on the left.
About the Software
I built the app to be scalable, so there’s a ShadeItemViewModel that contains all the logic to control each shade independently of each other, but still use the same FEZ HAT.
The UI you see is DashboardPage.xaml, it has a GridView at the top with an item for each ShadeItemViewModel. Under the GridView is the light and temperature measurements displayed in a Telerik RadGauge control with LinearGaugeIndicators.
Each item in the GridView has command buttons to open and close the shade, but also a custom control I made that indicates the current position of the shade.
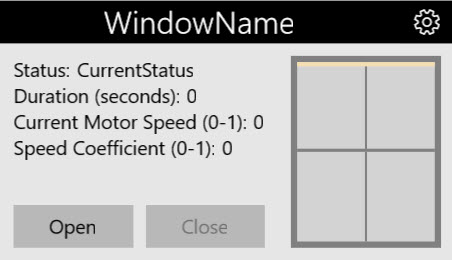
In the ShadeItemViewModel there are several properties to help tweak the motor speed and for how long to run the motor. I considered using a servo for a while, but I’d need to build a very high ration gear set to turn the degrees of the servo rotations of the shade. It’s easier and more scalable to use time.
This way anyone can change the time and speed of the motor from the settings button to fit their shade’s length. Also, the way the “% complete” algorithm works, it will adapt to the current settings and give proper percentages and it opens or closes.
I’m still experimenting with the motors. I’ll be 3D printing up some housings, and likely gears, to connect the motor to the shade. Once that’s complete, I’ll be writing part 2 of this series and give you all an update with any additional STL files so you can print up the parts for the motors.
Until then, enjoy running/exploring the code and trying it out for yourself!