The upcoming Windows 10 update, the Fall Creator’s Update, introduces a new design system, Microsoft Fluent Design System. The design system has 5 major building blocks:
- Light
- Depth
- Motion
- Material
- Scale
You can use any of these in a multitude of ways, however Microsoft has made it very easy to use in the latest Preview SDK (16190). Some of the things that used to be relatively hard, or at the least verbose, can now be done with a few lines of code.
Today, I want to show you the XamlCompositionBrushBase (aka XCBB). Before I do, let’s briefly run through a XAML Brush and a Composition Brush.
The XAML Brush
We use Brushes in almost everything we do, they paint the elements in an application’s UI. For example, UIElement.Foreground and UIElement.Background both are of type Brush.
The most commonly used Brush is the SolidColorBrush, an example of setting the Foreground brush:
XAML
<TextBlock x:Name="myTextBlock" Foreground="Black"/>
C#
myTextBlock.Foreground = new SolidColorBrush(Colors.Black);
There are other brush types, such as ImageBrush, that are good for specific approaches, that make our live easier because it would otherwise require more work to achieve the same result.
The Composition Brush
A composition brush utilizes the relatively new Composition layer in Windows 10. This layer sits underneath the XAML layer where all your XAML elements live. You can do a lot with the composition layer, animations, effects and more. The mechanism that paints Composition layer elements also uses a “Brush”, however it’s a type of Composition Brush and cannot be used with your XAML directly.
XamlCompositionBrushBase
With the release of the 16190 preview SDK, you can now use the Composition layer and XAML layer together by using the XamlCompositionBrushBase!
This is BIG news because the XCBB allows for interoperability between the Composition layer and the XAML layer and lets you set up composition effect without needing to implement a behavior or other more advanced setups. As an example, let’s create a Brush that applies the Win2D Invert Effect,
Note: I wanted to keep this as simple as possible to focus on XCBB, you can expand on this with more complex Effects, such as the GaussianBlur here.
First, let’s example the XCBB’s two methods that you want to override:
- OnConnected
- OnDisconnected
So, here’s our starting point:
public class InvertBrush : XamlCompositionBrushBase
{
    protected override void OnConnected()
    {
        // Set up CompositionBrush
        base.OnConnected();
    }

    protected override void OnDisconnected()
    {
        //Clean up
        base.OnDisconnected();
    }
}
Now, for the awesome part… the XCBB has a CompositionBrush property! All you need to do is instantiate your effect. Here’s the completed Brush code and I’ve broken it down to the important steps:
public class InvertBrush : XamlCompositionBrushBase
{
    protected override void OnConnected()
    {
        // Back out if it's not ready yet
        if (CompositionBrush == null) return;

        // 1 - Get the BackdropBrush
        // NOTE: BackdropBrush is what is behind the current UI element (also useful for Blur effects)
        var backdrop = Window.Current.Compositor.CreateBackdropBrush();

        // 2 - Create your Effect
        // New-up a Win2D InvertEffect and use the BackdropBrush as it's Source
        var invertEffect = new InvertEffect
        {
            Source = new CompositionEffectSourceParameter("backdrop")
        };

        // 3 - Get an EffectFactory
        var effectFactory = Window.Current.Compositor.CreateEffectFactory(invertEffect);

        // 4 - Get a CompositionEffectBrush
        var effectBrush = effectFactory.CreateBrush();

        // and set the backdrop as the original source
        effectBrush.SetSourceParameter("backdrop", backdrop);

        // 5 - Finally, assign your CompositionEffectBrush to the XCBB's CompositionBrush property
        CompositionBrush = effectBrush;

    }

    protected override void OnDisconnected()
    {
        // Clean up
        CompositionBrush?.Dispose();
        CompositionBrush = null;
    }
}
Now that the Brush’s definition is complete, how do we actually use it? This is the most exciting part… you use it like any other Brush in XAML!
<Grid>
    <Grid.Background>
        <brushes:InvertBrush />
    </Grid.Background>
</Grid>
Showtime
Here’s an example implementation. I have an Ellipse with an ImageBrush and it’s currently showing Tuvok (full disclosure: I’m a Trekkie AND a Star Wars fan)
<Ellipse x:Name="ImageEllipse">
    <Ellipse.Fill>
        <ImageBrush ImageSource="{Binding SelectedCharacter.ImagePath}" Stretch="UniformToFill" />
    </Ellipse.Fill>
</Ellipse>

If I put another matching Ellipse using my custom InvertBrush on top of the Tuvok Ellipse, here’s the result:
<Ellipse x:Name="ImageEllipse">
    <Ellipse.Fill>
        <ImageBrush ImageSource="{Binding SelectedCharacter.ImagePath}" Stretch="UniformToFill" />
    </Ellipse.Fill>
</Ellipse>
<Ellipse>
    <Ellipse.Fill>
        <strong><brushes:InvertBrush /></strong>
    </Ellipse.Fill>
</Ellipse>
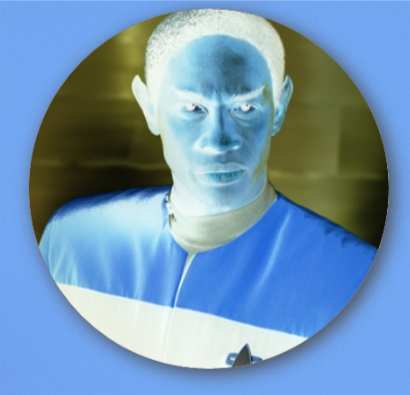
Notice how it only inverted what was directly behind the Ellipse and not the page background or the drop shadow?
Level Up
In the case of the InvertEffect, we don’t have any effect variables to update, so there’s no need for a DependencyProperty to set initial values of the effect. However, in most cases, you will need a DependencyProperty in your XCBB to tweak the effect’s values.
To see this, look at the BackdropBlurBrush example here and notice how the Blur.BlurAmount effect property can be updated by using a ScalarParameter when calling CreateEffectFactory.
I hope I was able to clarify how easy it is to get started using the XCBB and how this makes things easier for XAML devs to get the benefits of working with the Composition layer without doing a lot of work.
Happy coding!
Lance
in post: myTextBlock = new SolidColorBrush(Colors.Black);
should be: myTextBlockBrush = new SolidColorBrush(Colors.Black); ?
Yep, that would certainly be a better name for the variable.
I fixed it. The intent was to set the Foreground of the TextBlock from code-behind. I update it so that the XAML instance had an x:Name and then set the Foreground property to the SCB