[EDIT Updated to include ARM64]
I was given the honor of having early access to Windows 10 on ARM (WoA) so that I could chronicle the experience and provide you with tips to ensure that your development experience is smooth. I’ll go through a list of potential issues you might encounter, along my fix for each.
What this post is:
This article is intended to be a quick guide on how to set up the device so that you can deploy and debug your apps. I will be writing this from a UWP developer’s perspective, sharing the experience of deploying and debugging this real time video effects test app.
Several of my fellow MVPs also got a device and will be writing posts about their experiences as well. Some articles will be UWP specific and others win32 specific, see the Additional Resources section at the bottom of this post.
What this post is not:
This will not be a “product review” style post about the device or the OS itself. I will say this: I am very impressed; it’s just Windows 10 and I really wouldn’t be able to tell it was on ARM until I realized that it’s been 2 weeks since I last charged it 🙂
Okay, enough intro talk, let’s get our hands dirty. First, a little primer on x86 emulation, an explanation of how Microsoft was able to get Windows on ARM and how your app will work.
How Windows on ARM works
Chances are you’re using a 32 bit application right now, but your PC is running a 64 bit version of Windows running on an x64 CPU. How does an application with 32 bit instructions work on a CPU that expects 64 bit instructions? This is accomplished using x86 emulation, provided by the WOW64 layer in Windows (WOW64 stands for Windows 32bit on Windows 64bit).
To create Windows on ARM, Microsoft ported Windows 10 to ARM64! The kernel, shell, in-box drivers and in-box apps all run native on ARM. What about your apps? Windows on ARM has x86 Win32 emulation!
The WOW abstraction layer, in concert with a custom x86-to-ARM emulator and CHPE dlls (x86 assemblies with ARM64 code in them, pronounced “chip-ee”), your x86 application can run in an emulated process on an ARM CPU.
Here’s a diagram to better explain it
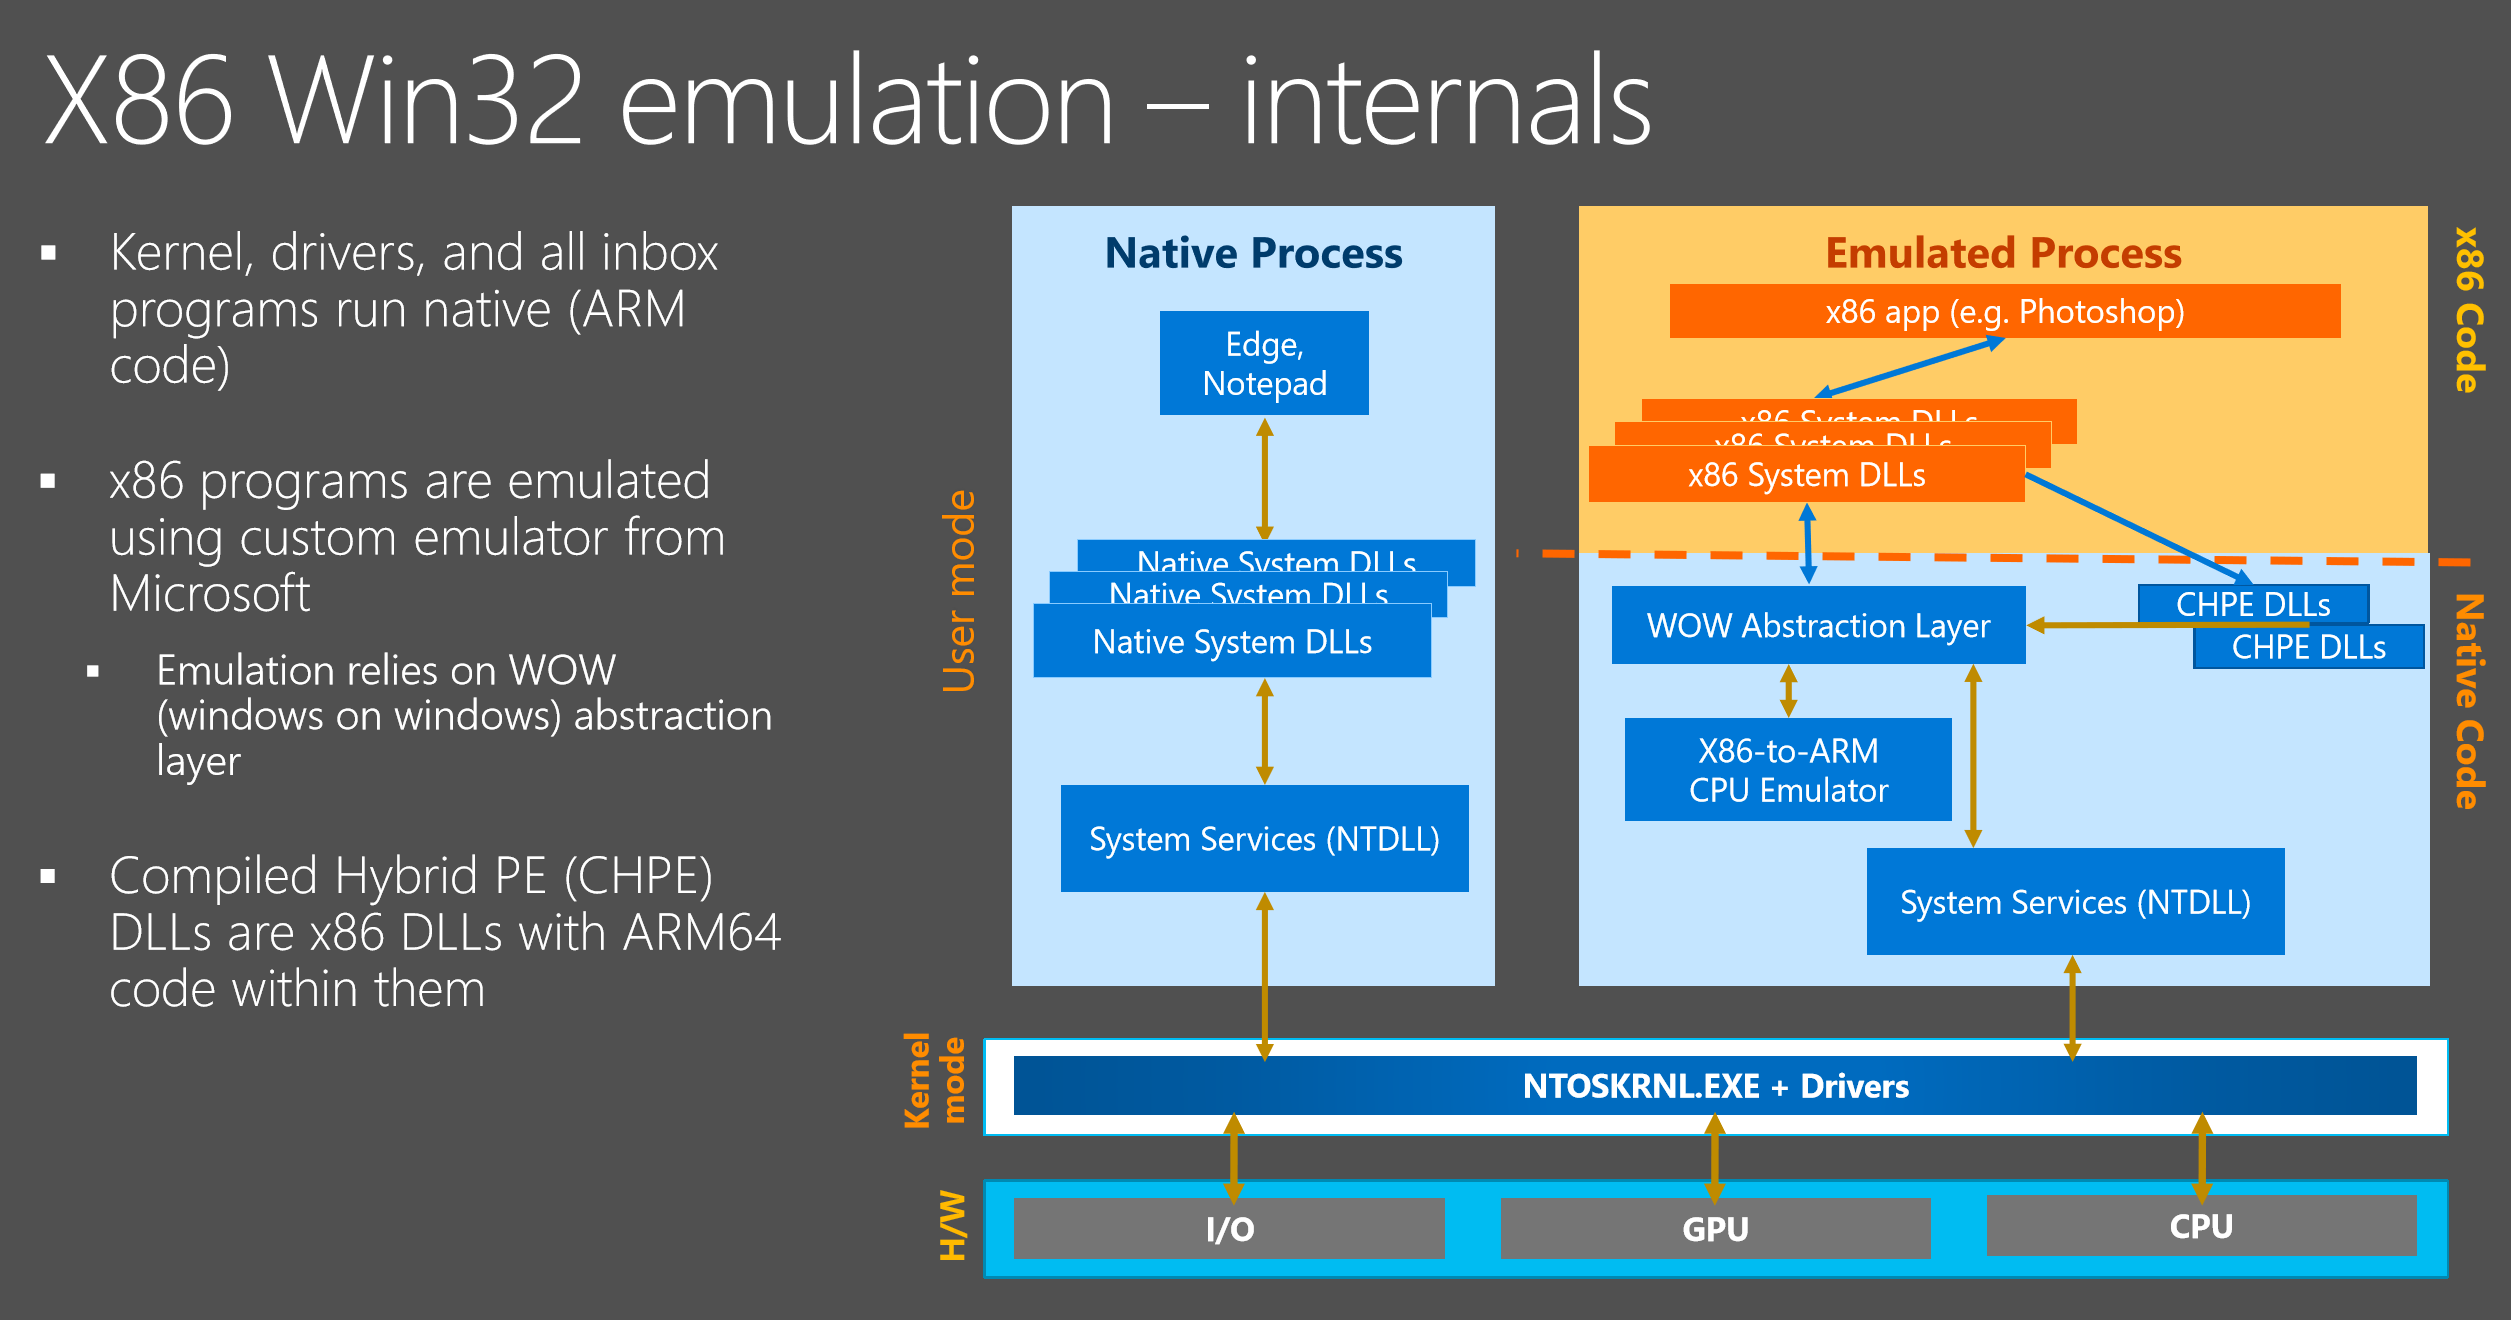
Some key features
- The x86 app win32 app runs unmodified
- The app will installs and run like it does any other PC
- The x86 instructions are translated to ARM64 at runtime and they get cached so that future app runs are faster!
Application Support
Windows on ARM supports applications
- Store apps (ARM, ARM64 preferred, x86, x64)
- Win 32 apps (x86, x64 on Windows 11).
Tip: If your Store application has an ARM package available, it will be installed and will run natively as this provides the best user experience. Where possible, make sure all of your Store apps also have an ARM64 package.
If you’re not sure how to do this, when you go to package your app, you’ll see four checkboxes, make sure ARM64 is selected. For Win32 apps, you can use NGEN (see #2 under the General Tips section below).
Limitations
There are some limitations at this time
- No kernel mode support
- Apps that rely on drivers may not work (the driver developers should start updating their drivers for ARM support)
- Apps that inject code into Windows processes won’t work
For more info about Windows on ARM, take a look at Kevin Gallo’s Community Standup video here and the Build 2017 session from Hari and Arun here.
Okay, now with a high level look at how WoA works, let’s dig into my experience and how I hope it helps you
Familiar Ground – Remote Debugging
If you’ve used Visual Studio’s remote debugging tools before, for example with Hololens or Windows IoT, then you’ll feel right at home. The process is essentially the same, but with a couple things to keep an eye out for when you’re first getting started.
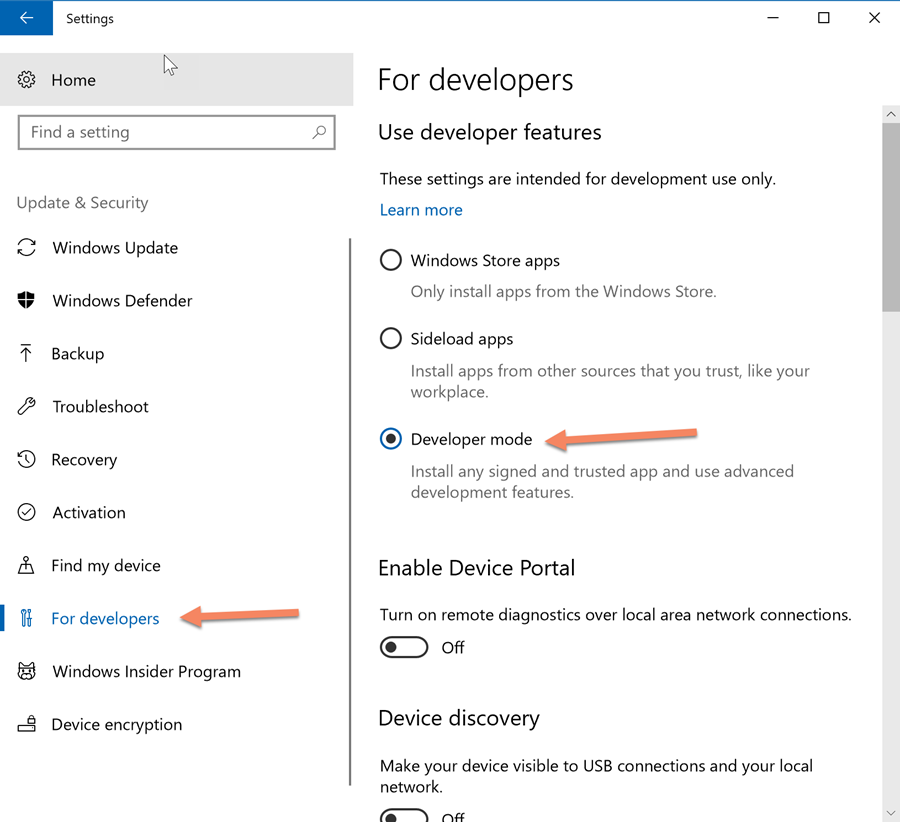
The first thing you need to do is enable Developer Mode in the device’s PC Settings > Updates and Security > For Developers page. Not only so that you can deploy apps to the device, but also to enable the Remote Debugging tools.
Here’s a screenshot of the PC Settings page:
However, you may not see this option, which brings me to my first point.
Potential Issue #1
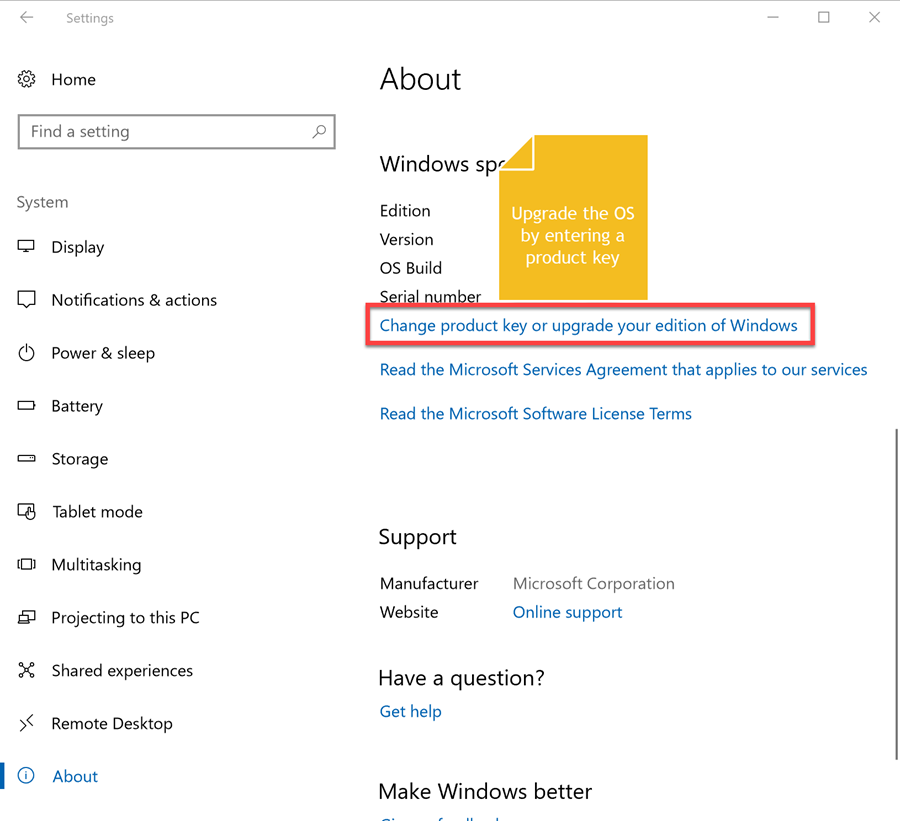
My device came with Windows 10 S out of the box, this means that I will not see a “For Developers” item on the Settings > Update and Security page (screenshot above).
Fix
Upgrade the OS. I used a product key for Windows 10 Pro in the Settings > System > About page, but you can use whichever option is available to you.
After updating you’ll now see the Developer Mode option on the For Developers page, toggle that to move forward. Enabling this will trigger a download an installation of a Developer Mode package that contains the Remote Debugging Tools.
Potential Issue #2
You may experience an issue where the developer mode package didn’t install correctly, you should see a “Remote Debugging Tools Installed” success message. If you didn’t or see an error message, this means that you will not have the tools on that machine and you’ll get frustrated when trying to deploy from Visual Studio.
Fix
Download and install the tools manually, you can find the download here. Alternatively, you can copy over the tools from your dev machine if you’re familiar with the steps, but installing the tools is the most straightforward option: run and done.
Targeting the Remote Device
If you’re not familiar with using the Remote Debugger, I strongly urge you to read this Microsoft documentation article, but let’s go through the main steps.
Changing Target Device to Remote Machine
If you open your application’s Properties page in Visual Studio, and switch to the Debugging tab, you’ll see that you have a Target Device drop down.
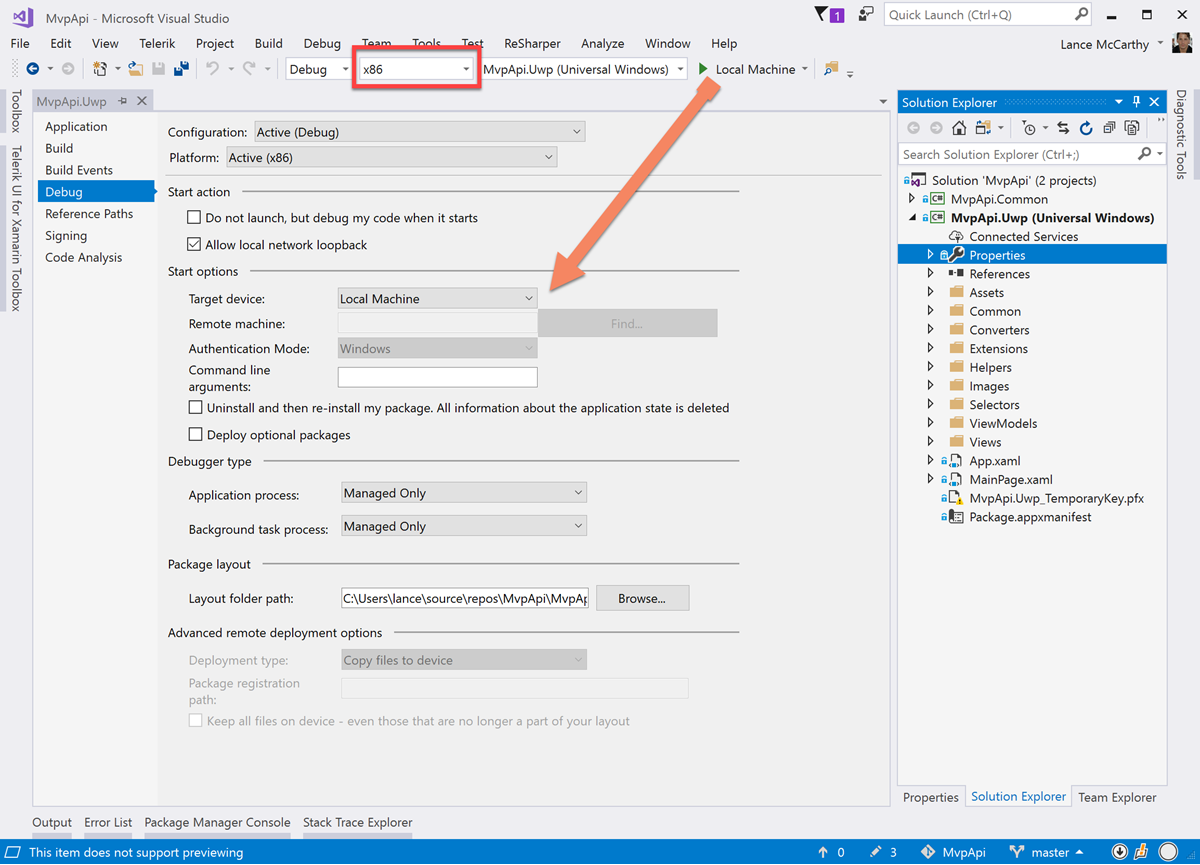
Switch that to Remote Device, then the “Find…” button on the right will become enabled. After clicking the Find… button, you’ll be presented with the following UI:
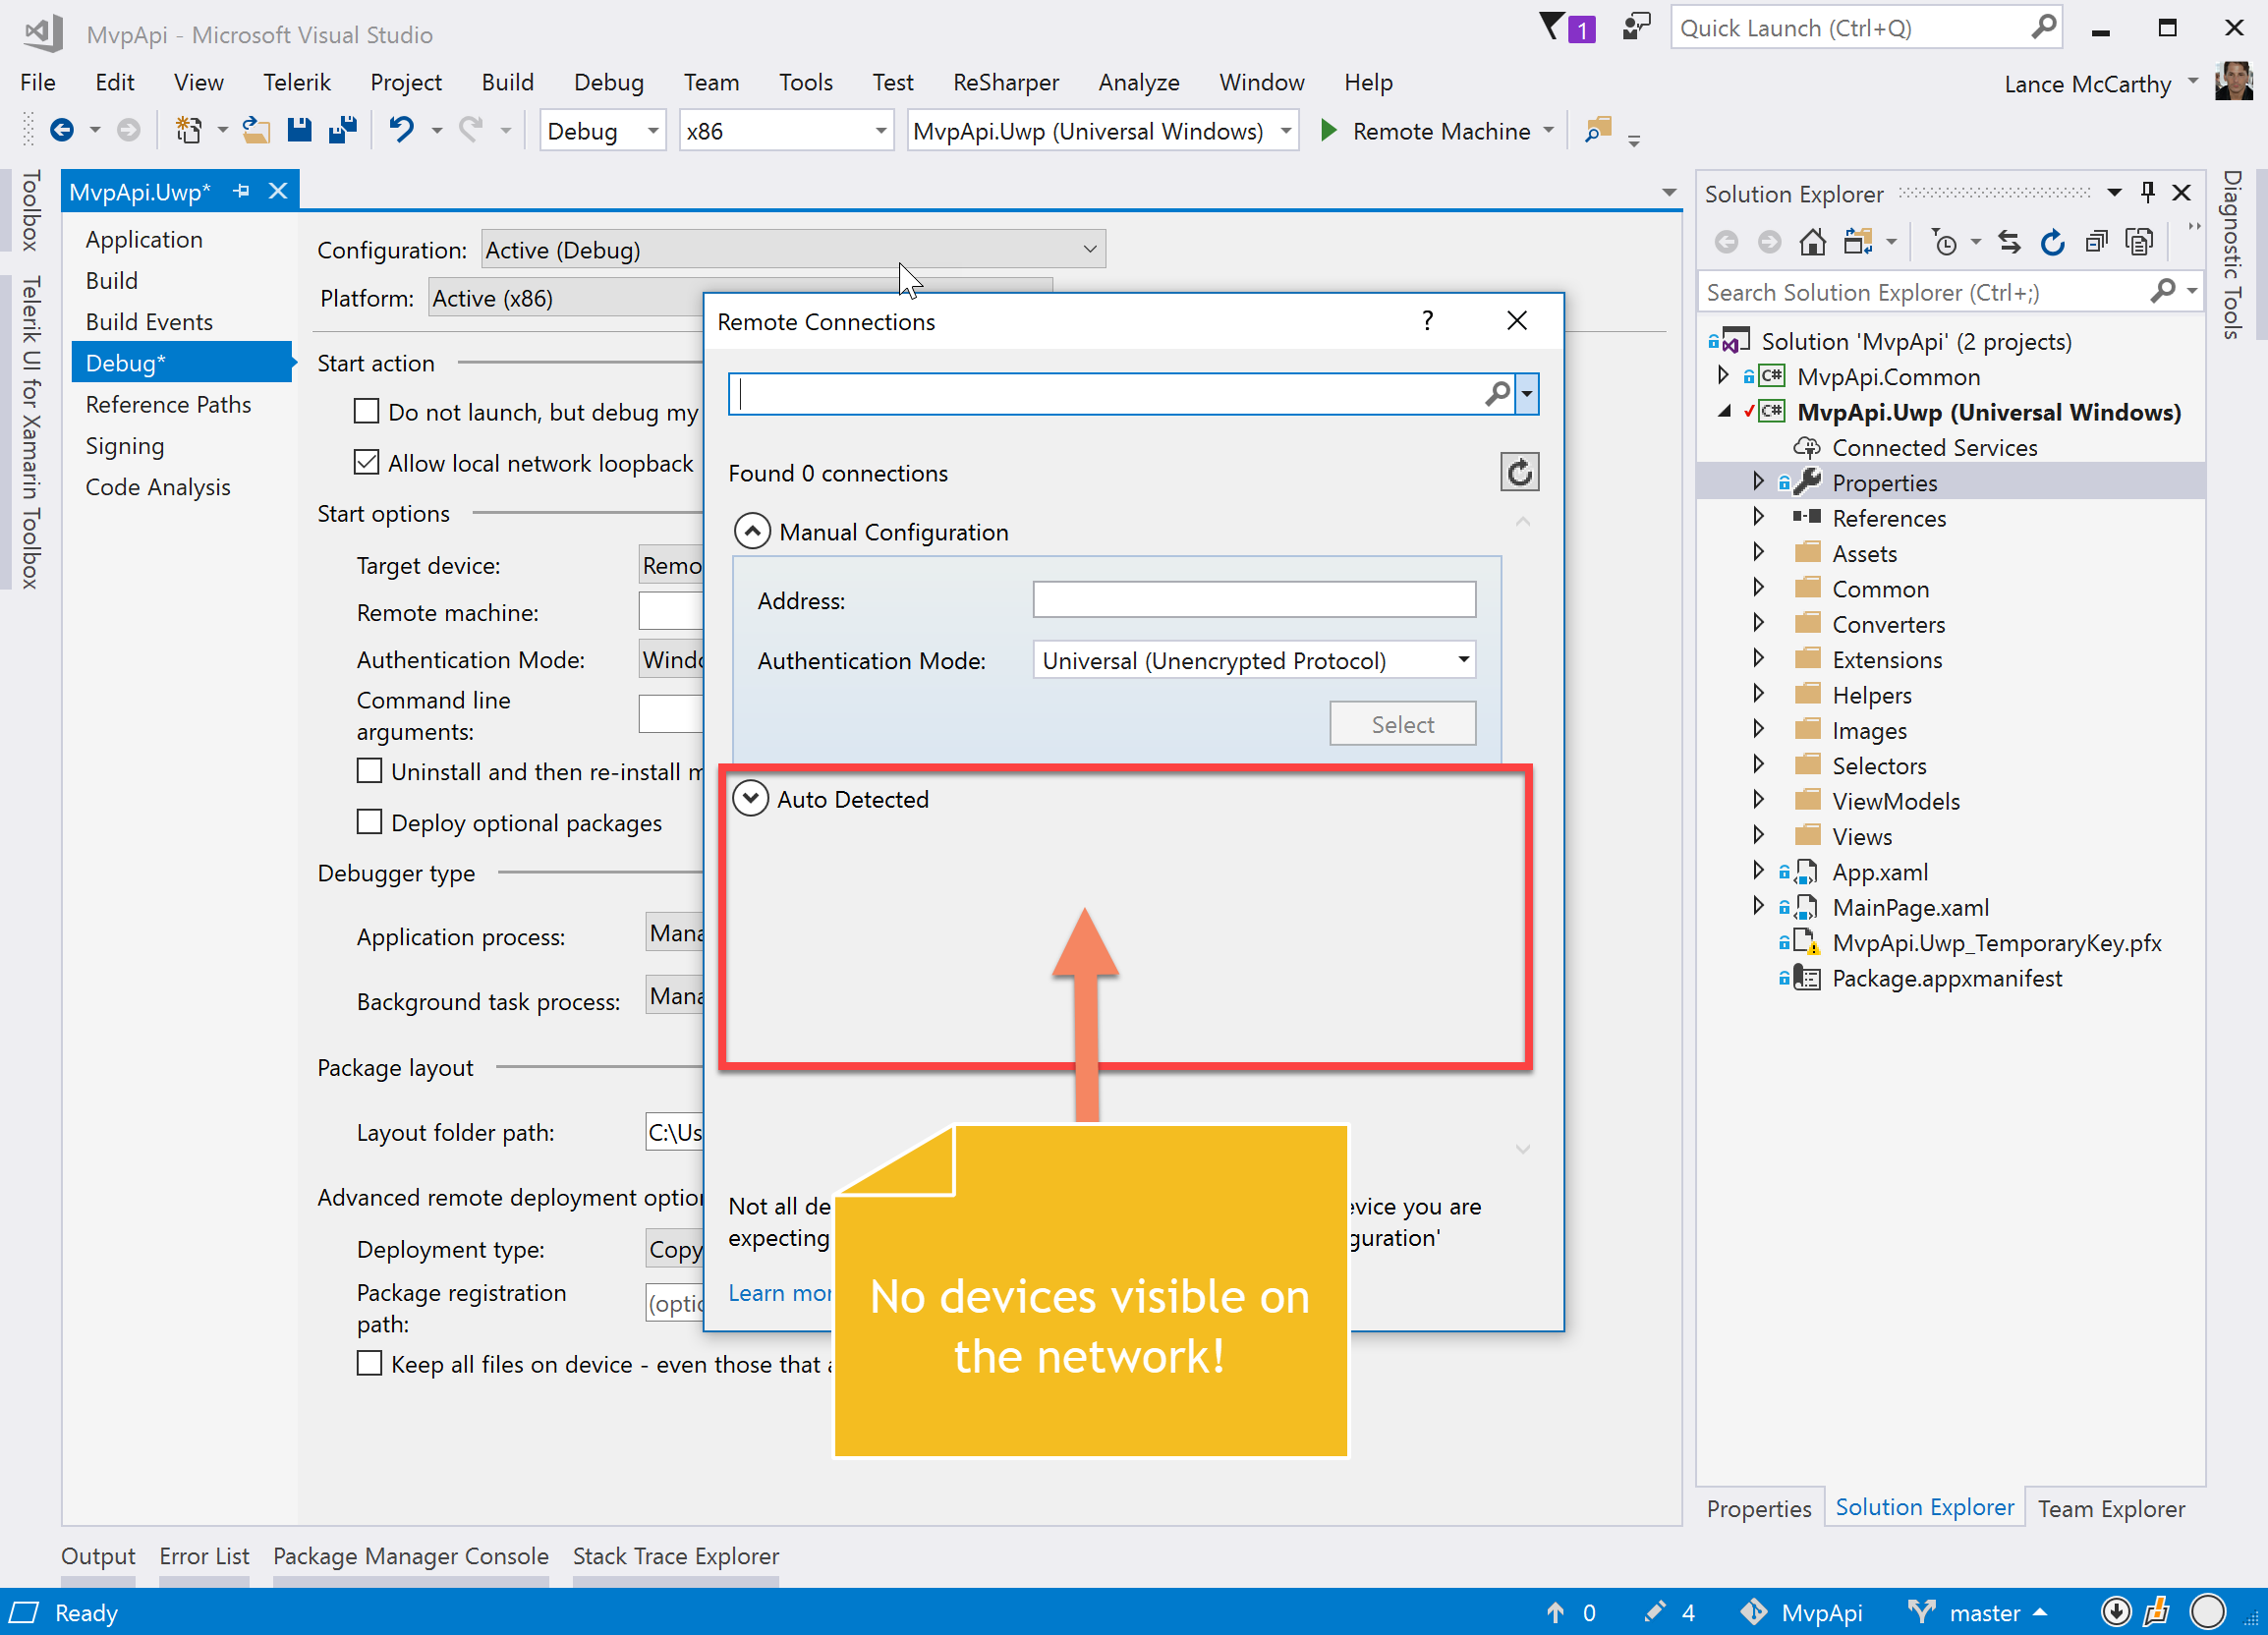
Now you have an opportunity to select a remote device, but you will most likely see that the ARM PC isn’t showing as an available device to target.
There are two ways to solve this, use the device’s IP address or let “Auto Detected” find it for you. In both cases, the device needs to be visible on the network, but Auto Detected is far better because it helps with setting Authentication Mode.
Potential Issue #3
No devices are in the Auto Detected list or you can’t connect using IP address.
Fix
You need to make sure that the both the development PC and the ARM PC need to be on the same network and that Network Discovery is enabled.
The quickest way that I like to do this (there are other ways), is just to use File Explorer and selecting “Network” in the pane and follow the prompts.. Easy Button style. Here are some screenshots to guide you:
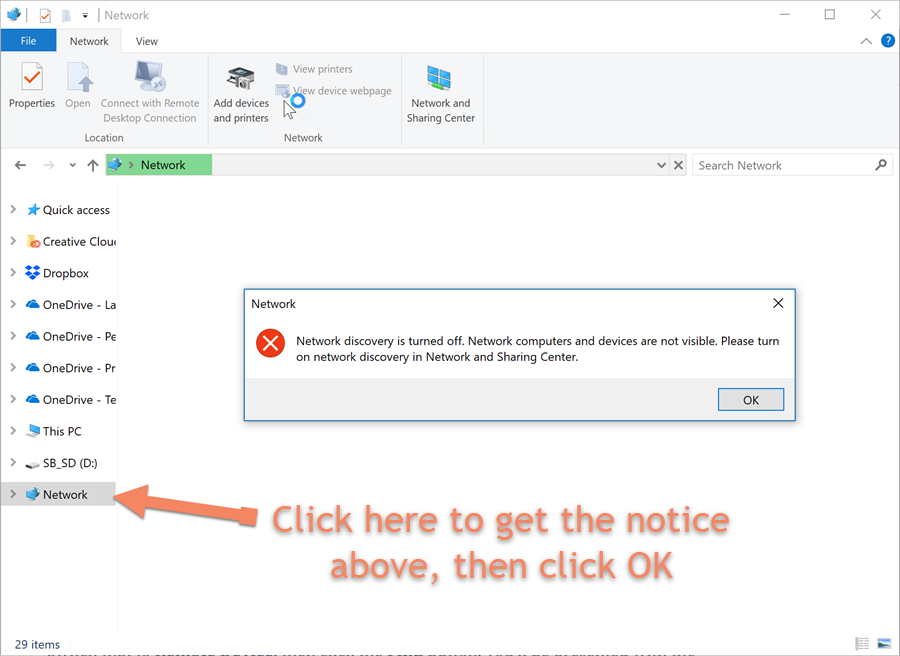
Once you click the OK button, File Explorer will show a yellow bar at the top:
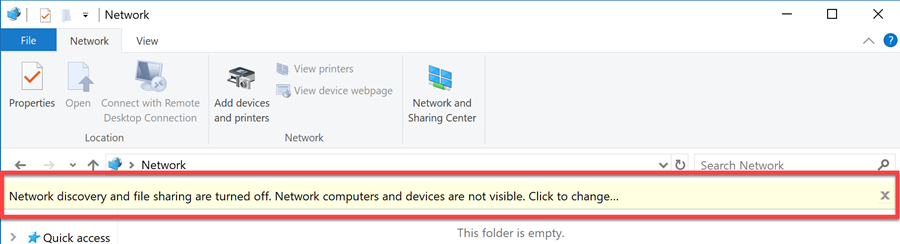
Click that bar and follow the prompts, it will ask you to make the network you’re on a Private Network (that’s my preferred option as it’s the safest). You’ll now see that the PC will scan the network, finding other devices and listing them in File Explorer. Go ahead and close File Explorer now that it has done its job.
NOTE: If you need to, repeat this process for your development PC.
Connecting
With both PCs visible on the Network, reopen the Remote Connections dialog window again (using the “Find…” button) and check the Auto-Detected list for the ARM PC. Select it, then follow the steps to connect and pair it.
Potential Issue #4
You’re not able to see the device in the Auto-Detected list, and you’ve hit Refresh button to scan again.
Fix
You can instead use the ARM device’s IP address and select “NONE” for the authentication option. When selecting this route, you’ll be shown a PIN number to pair to Visual Studio.
I haven’t been able to get Universal Authentication to work with manual IP address connection yet, but my follow MVP testers have and their blogs posts may touch on this further.
Congrats, now you’re ready to deploy!
Debugging & Deploying
Before you click F5 (or that shiny green start debugging button) for the first time, let’s review another issue you will encounter that might you might miss. I didn’t see it the first time because I was looking at Visual Studio instead of the device.
Potential Issue #5
When debugging, you do not see any runtime analytics / debugger metrics in Visual Studio Diagnostic Tools window (usually at the top right):
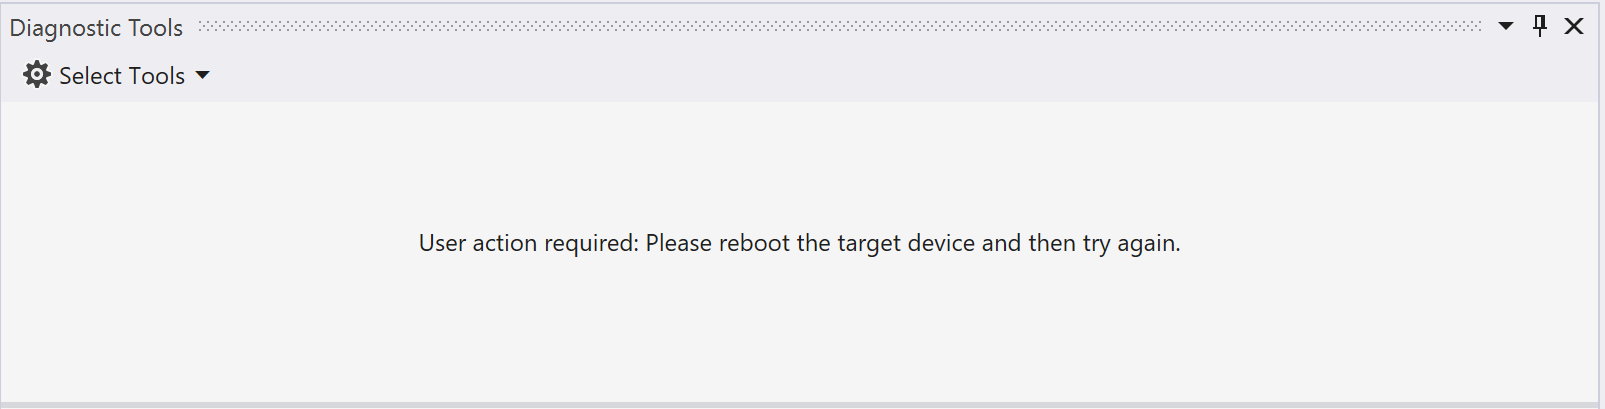
Fix
Keep an eye on the ARM device for an elevated permissions UAP prompt the first time you deploy. You may only see a TaskBar yellow-flashing icon and not a full screen prompt, click the icon to see the prompt and allow it.
General Tips
You’re going to be quite surprised at how well everything just works, In several cases, I found my apps worked faster on the ARM device than my dev PC!
Tip 1 – Failure to launch
When remote deploy does’t work, look at the Visual Studio build output window. Close to the end of the build output, you’ll probably see a reason why the deploy failed.
You’ll most likely see one of these errors (click the link to view the respective troubleshooting article):
- Error: Unable to Automatically Step Into the Server
- Error: The Microsoft Visual Studio Remote Debugging Monitor (MSVSMON.EXE) does not appear to be running on the remote computer.
- Unable to Connect to the Microsoft Visual Studio Remote Debugging Monitor
-
Error: Remote machine does not appear in a Remote Connections dialog
Issue 2 – Slow first launch
When using an x86 application on Windows 10 on ARM, the first time an app launches it will be a little slower. This is because the x86 to ARM translation will occur the first time, but the result is cached on disk so the future launches are significantly faster.
Also, while waiting for that first launch, don’t try to relaunch it again. Otherwise, you’ll end up opening multiple instances of the app that will further slow things down (it can take 5-30 seconds depending on how much translation needs to be done). I’ve communicated my feedback to Microsoft that there should be some sort of indication that the app is starting up (e.g. a flashing taskbar icon).
Workarounds:
- If the app is a Store app, provide an ARM package so that it runs natively and doesn’t need emulation.
- If the app is a win32 app, try using NGEN.
Wrapping Up
This post will be a living document for a little while, I’ll come back and update the post with anything new I find, and continue to share my tips with you. I’ll be sharing my fellow MVP’s posts as they become, see them under the Additional Resources paragraph below.
I hope you enjoy running your x86 apps on an ARM device as much as I have, it’s a wonderful future for mobility and battery life where you don’t have to sacrifice your library of applications because of a CPU’s architecture.
- Anything I can help with?
- Are you stuck trying to deploy your app?
Leave a comment below or reach out to me on Twitter here (please remember that I can only answer development-specific questions).
Additional Resources
I will update this list as more posts from my fellow MVPs, and Microsoft documentation, becomes available.
MVP Posts
- Daren May – Remote Debugging UWP Apps on Windows 10 on ARM
- Morten Nielsen: Building an ARM64 Windows Universal App
Microsoft Articles